Brain Lord
|
|
| Brain Lord |
|---|
|
Developers: Produce,
Opus
|

| To do: More regional differences. (e.g. different title screen) here. |
Brain Lord is a short-but-fun action RPG with heavy emphasis on puzzle solving.
Contents
Sub-Page
| Notes |
Debug Menu

Use Pro Action Replay (PAR) code 7E01B856, open the regular menu, and press Select. The menu itself is somewhat difficult to use, however.
- Warp - This is a much more powerful teleportation tool than the Debug Warp Gate, but is a lot harder to use. Selecting this option brings up a box with a number in it. While there's no visual indication of it doing so, pressing Up increases the number, while pressing Down decreases it. You can cancel away the box with A and re-open it, however, and the number shown will refresh. Pressing B sends you to whatever area that ID belongs to.
- Escape - Brings up a Yes/No box. Effect currently unknown.
- Flag - Sets various flags. This option functions similarly to Warp, except that there are two digits shown. The one on the left can be raised/lowered the same way as Warp's value above (and again, the number displayed won't update unless you close and re-open the menu), while the right one can be increased by pressing Right, then B. The first few flags tend to get cleared (set to 0) when using the inventory, or just entering a map.
- Items - Selecting this option gives you all of the following items, in this set order, provided you have the inventory space for them. Repeated usage just gives you another set of the items, again, space permitting.
- Master Key (debug item)
- Debug Warp Gate (debug item)
- Debug Mirror (debug item)
- Warp Gate (normal)
- Reviving Mirror
- Buckler
- Round Shield
- Kite Shield
- Bone Shield
- Warrior Shield
- Battle Shield
- Blackgold Helm
- Royal Armor
- X-Ray Glasses
- Wind Shoes (debug item)
- Cape
- Magic Wallet
- Fire Sword
- Drink
- Spike Boots
- Cape Herb
- Antidote Herb
- Barrier Capsule
- Power Capsule
- Heart
- Source of Power
- Drop of Protect
- Life Jade (named "0Ason")
- Crimson Jade (named "0Ifrie")
- Foundation Jade (named "0Golem")
- Power Jade (named "0Sarah")
- Lightning Jade (named "0Polulu")
- Anger Jade (named "0Wak")
- Water Jade (named "0Domul")
- Deceased Jade (named "0Kass")
- Light Jade (named "0Pazun")
- Lightning Jade (named "0Jima")
- Anger Jade (named "0Griffin")
- Water Jade (named "0Priss")
- Great Ax
- Chuckler
- Heavy Mall
- Heavy Bow
- Platinum Sword
- Level - Sets the levels of any Jades you are using. Same deal as "Warp" and "Flag", except the two numbers that appear are both changed by pressing Left or Right. The top number corresponds to the first Jade, while the bottom number corresponds to the second. Although the game will not allow you to increase these values beyond 19, you can bypass this check and go as high as 255 by decreasing the values past zero.
- Slow - Brings up a Yes/No box. Effect currently unknown.
- Time - Brings up a Yes/No box. Effect currently unknown.
- Set - Brings up a Yes/No box. Effect currently unknown.
- Task - Brings up a Yes/No box. If set to "Yes" the HUD will not be shown. Presumed to be used for special cutscenes.
- Sound - A sound test. As with all the menus, the number displays won't increase unless you cancel out of the menu. The upper value (music) can be changed by pressing Left / Right and played with B. The lower value (sound effects) functions the same way, but you'll have to first press Down to reach it. Song 26, it should be noted, is unused.
Unused Content
Enemy

The single unused enemy in the game. It will disappear and reappear at intervals, placing itself at different spaces around you. When appeared, it will disappear/reappear every frame to simulate a "transparent" effect. When it gets close to you it will slash at you, dealing a great bit of damage.
The "Stop" spell works wonderfully on this monster. In the final game, Stop is praised a lot but doesn't actually get much use. It's possible that Stop was supposed to help defeat these monsters in the game.
However, there's a pretty large issue with this monster: it will freeze the game seemingly at random if it's within range of its AI being activated. That aside, it seems fully functional.
Areas
| To do: There's a few other unused rooms. |
There are a few unused rooms in the game. While unused, they typically still contain objects for use.
Map 50 is a room in the Tower of Light. It isn't accessed anywhere in the ROM aside from the debug warp gate pointer. You can get into this room by using the debug enabling code above and using the warp to go to map 50. The tile on the right teleports you to the hallway between the room with the "bouncing" steel ball, and the room with the merchant.
Map 179 is in the Abell Ruins. It looks very similar to a room you can drop into which gives you a Heart and a Warpgate. This room, however, has a Drop of Protect in the left chest and a Warpgate in the right. The stairs take you where the other room would - the first big room with the disappearing blue floors.
Not all the rooms in the game are accessible through the debug warp function, as it has its own pointer list.
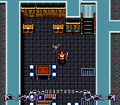
Room 179
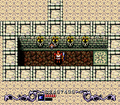
Room 50


Items
There are a number of unused items and pieces of armor, including a few powerful debug tools.
 Master Key - A debug item which is supposed to be able to unlock any of the game's many locked doors, but its code has been removed and it now simply functions like any other unusable item.
 Debug Warp Gate - Another debug item. This functions similarly to a normal Warp Gate, but contains far more places you can be transported to (including, but not limited to, cutscenes and even the ending). It can be used infinitely. A full list of places you can warp to with this item can be found on the Notes page.
 Debug Mirror - Another debug item that had its code stripped away. It now functions like a piece of armor that has 0 defense.
 (Unnamed Item) - Has no name and no effect, but can be sold for a whopping 10,000G. There are several other items in the game which likewise serve no purpose but to be sold, such as the Gold and Silver Bullion, so why this item was cut is unknown.
 (Unnamed Helmet A) - The first of three unnamed helmets, this one is also the weakest...yet with a defense power of 14, it's still stronger than the Platinum Helm, the strongest headgear normally available. Unlike the other unused items, this one just recycles the icon from the Cross Helm.
- (Unnamed Helmet B) - Also recycles the Cross Helm's icon. This one has 16 defense.
- (Unnamed Helmet C) - The third and final nameless helmet, and the strongest, with a defense of 17. Still reuses the Cross Helm icon, though.
 (Unnamed Armor A) - More unnamed, yet very powerful, equipment. This time, it's a suit of armor with a whopping 20 defense, five points higher than the Royal Armor.
 (Unnamed Armor B) - Another nameless suit of armor, this one gives the same speed boost the Cape offers, but also has a defense of 10.
 Shield - This isn't technically dummied out, but the only time you can use it without hacking is in the arena, and its icon is also otherwise never seen. It functions as any other shield, but never breaks.
 Wind Shoes - This fine pair of footwear allows you to walk over all manner of traps and pits. The game doesn't come right out and say it, but given it allows you to effectively circumvent a large majority of certain dungeons (including the final one), it's very likely this is another debug tool.
Music
A song that can only be heard via the debug menu, by playing track 26 in the sound test. It's an upbeat, peppy tune that could have worked well for the game's "attract mode" (which is oddly silent) or as an alternate credits theme (as the one that is used is surprisingly somber).
Object
![]()
This orb-like object is loaded into VRAM whenever a Warp Gate item (or the Dragon Scale) appears on-screen. What purpose it would have served is unknown; it may have been intended to be a field icon for Barrier Capsules/Speed Capsules, which are never dropped by enemies or hidden in jars. The palette is guessed.
Warp Point

Normally, each dungeon has four save points which, once activated, can be warped back to immediately via a Warp Gate. However, not only does the Platinum Shrine only have three such save/warp points, it awkwardly skips the second one on the warp menu. You can warp there with the Debug Warp Gate, but it merely leads to a nondescript area not far from the first save point.
Regional Differences
| Japan | US |
|---|---|
 |
 |
For some reason, the US version changed the main character's hair from blue to brown.
Other Differences
| This page or section needs more images. There's a whole lotta words here, but not enough pictures. Please fix this. |
- The Enix logo shown before the title screen was changed from green to pink.
- In the Japanese version there was an extra option in the configuration setting in the menu called "Sound". The "Sound" option was removed in the US version.
- Enemies had their stats beefed up in the US version.
- The power of weapons were reduced by half in the US version.
- The three sorceress' home has a Judaism symbol in the Japanese version. The Judaism symbol was removed in the US version.
- In the Japanese version, in the Ice Castle, in the room where you fight Ramus' ghouls is comprised of one solid straight line with both halves being formed of ice with zero holes. The US version changed this to have the whole floor icy and added four holes you had to be careful not to fall in.
- Pages missing developer references
- Games developed by Produce
- Games developed by Opus
- Pages missing publisher references
- Games published by Enix
- SNES games
- Pages missing date references
- Games released in 1994
- Games released in January
- Games released on January 27
- Games released on January 28
- Games with unused areas
- Games with unused enemies
- Games with unused graphics
- Games with unused items
- Games with unused music
- Games with debugging functions
- Games with hidden sound tests
- Games with hidden level selects
- Games with regional differences
- To do
- Needs more images
Cleanup > Needs more images
Cleanup > Pages missing date references
Cleanup > Pages missing developer references
Cleanup > Pages missing publisher references
Cleanup > To do
Games > Games by content > Games with debugging functions
Games > Games by content > Games with hidden level selects
Games > Games by content > Games with hidden sound tests
Games > Games by content > Games with regional differences
Games > Games by content > Games with unused areas
Games > Games by content > Games with unused enemies
Games > Games by content > Games with unused graphics
Games > Games by content > Games with unused items
Games > Games by content > Games with unused music
Games > Games by developer > Games developed by Opus
Games > Games by developer > Games developed by Produce
Games > Games by platform > SNES games
Games > Games by publisher > Games published by Square Enix > Games published by Enix
Games > Games by release date > Games released in 1994
Games > Games by release date > Games released in January
Games > Games by release date > Games released in January > Games released on January 27
Games > Games by release date > Games released in January > Games released on January 28