Clock Tower (SNES)
| Clock Tower |
|---|
|
Developer: Human Entertainment
|
Clock Tower is the first entry of the successful series and the only one to never be released outside Japan (along with its 1997 PlayStation port Clock Tower: The First Fear). Luckily, an English fan translation is available.
Contents
Sub-Page
| Notes |
Unused Text
| To do: Find and add the original unused Japanese text. |
| Japanese | English Translation |
|---|---|
| 178: Looks like a dagger. | |
| 179: Picked up a dagger. | |
| 305: A dagger shone faintly. | |
| 306: Picked up a dagger. |
As the green dagger was removed (see below), all the related text goes unused. The first two lines are stored along with the shed dialogue, while the other two are for the trophy room where you would eventually obtain it in the PlayStation port.
| Japanese | English Translation |
|---|---|
| 80: What a mess. |
Meant for checking a drawer in the living room. Used in the PlayStation version.
| Japanese | English Translation |
|---|---|
| 89: A floor lamp is placed here. |
Found among the bedroom's text. An unused lamp sprite exists as well.
| Japanese | English Translation |
|---|---|
| 171: It's a swimming pool. | |
| 218: It hasn't been used in ages. | |
| 219: The water stagnated to black. |
Meant for the pool in the courtyard. There is no way to click on it in the game.
| Japanese | English Translation |
|---|---|
| 231: My foot's caught! |
Stored with text for climbing the rubble pile where you get the rock.
| Japanese | English Translation |
|---|---|
| 268: It's too dark to see inside there. | |
| 269: Something grabbed my arm! | |
| 270: Rrgh... aah...ah... | |
| 271: There's a note here. | |
| 272: From Simon to Mary. | |
| 274: Can't reach it... |
These are all for the library. There's a hint that the lantern is needed to reach into the wall which was apparently also intended to be trap. Also seems that a note written by Simon could be found in here, possibly in the removed coffer detailed further below.
| Japanese | English Translation |
|---|---|
| 303: There's junk in here. |
Used in the PlayStation version when checking the box in the trophy room.
| Japanese | English Translation |
|---|---|
| 364: This is a record player. | |
| 365: Looks like it broke. |
Meant for the record player in the child's bedroom, which cannot be inspected in the game.
| Japanese | English Translation |
|---|---|
| 469: Lots of cheap magic books.. |
Supposed to be used in the mural room but doesn't show up regardless of which route you're on.
| Japanese | English Translation |
|---|---|
| 496: Ah...! | |
| 497: The egg... |
Unused text for the bird's nest.
| Japanese | English Translation |
|---|---|
| 501: The hinge is broken. |
Could be meant for the unusable door in the west wing.
| Japanese | English Translation |
|---|---|
| 44: Going up... | |
| 45: The controls aren't working |
Unused text for the elevator.
| Japanese | English Translation |
|---|---|
| 400: There's a lantern here. | |
| 401: The power to the elevator is on. | |
| 402: The power source was switched on. | |
| 407: The elevator light lit up. |
Text for the cave area filled with water. Apparently this was where you would originally find the lantern, as the message here is different than when you find it by the broken window. The elevator power is also mentioned here which could be related to the fuse box inside the background wall.
| Japanese | English Translation |
|---|---|
| 408: An elevator. | |
| 409: Looks like it won't move. |
This won't be seen as you can only interact with the elevator call button and not until it's already working.
| Japanese | English Translation |
|---|---|
| 300: The wind feels strong. | |
| 301: No good, my foot... | |
| 302: Ah...ugh...... | |
| 411: I'm trapped... | |
| 412: This game of tag is over! |
The last line is used in the PlayStation port when Ms. Mary's grabbing Jennifer's foot on a ladder. 411 is also spoken by Mary, meaning either the text, translation or the chosen portrait is wrong.
| Japanese | English Translation |
|---|---|
| 435: Laura. | |
| 436 (Laura's portrait): Mm... | |
| 437: Ann. | |
| 438 (Ann's portrait): Uhn... |
Likely meant for the S ending where you find one of your friends alive but injured.
Development / Debug Strings
There are various text strings from development left in the ROM.
| ILLEGAL FACE | ILLEGAL ANIME |
Some error messages for trying to load an invalid portrait or cinematic image.
| DATALINK IS OLD OR FAILURE | VOICEON |
| CANNOT MEMORY ALLOC ERROR |
| HUMAN CORP |
| START OF MULTI5 CONNECT CHECK | MODIFIED FROM SHVC MULTI5 CONNECT CHECK VER1.00END OF MULTI5 CONNECT CHECK |
Soon after the MULTI5 text comes the content displayed on the region error screen. More development-related strings:
| MOZAIKU JOB : | ENABLE | DISABLE |
| SYSTEM2 2.99HS | DEAJEJ | CLOCK TOWER SFX |
| PUSH B BUTTON |
| CAUTION |
Unused Graphics
HUD Elements
There's one unused portrait of a rather distressed Jennifer. The background color is fully capable of changing depending on Jennifer's life, like all others. It can be brought back with Pro Action Replay (PAR) code 7FCA4709. This portrait appears in the PlayStation port if Jennifer drinks from the cupboard in the kitchen and the drink knocks her out.
Two unused cursor sprites are loaded into VRAM, along with the regular cursor and items. The size of the first one makes it similar to the item selection cursor for the inventory in the PC version. The other one looks like something an in-game editor would use during development. The player palette was used for these images, as the normal cursor palette wasn't suitable.
This green dagger can't be found anywhere in the mansion, and it was part of a removed puzzle (read below). Can be brought back with Pro Action Replay (PAR) code 7E132306, but does not interact with anything. When equipped, it's named "青銅の短剣" (bronze dagger).
This unused key sprite is only found in the SNES version. Since the item tiles and item IDs are in the same order, one can assume that this is the "Ceremony Key", which comes after the "Copper Key" in the list. The four keys that normally don't show up in the inventory can all be placed there by hacking. Doing that won't show any valid sprites, though.
As the elevator only goes up, this tile is never seen.
Characters
| Jennifer Unused Graphics Many animations were replaced or just never implemented. |
| Bobby Unused Graphics Mostly animations that would let him follow you everywhere. |
Each one of Jennifer's friends has an unused front-facing sprite.
Laura additionally has two unused palettes likely meant to go along with the flashing bathroom lights.
Mary has some unused animations in which her hands are raised. There is also an idle animation of her in the black robe. She's already walking when you see her like this in-game.
Room Objects
The mirror in the first bedroom has a shattering animation that goes unused in the SNES version of the game. It is fully implemented in later ports. In addition to this, there are some unused reflection animations as well.
There's also an unused lamp sprite meant for the bedroom.
An animation of the insecticide can suddenly tipping over.
Looks like Jennifer could miss Bobby when she's throwing the can against him. Would probably be seen if the panic button had actually been put to use in that scenario.
Among the east storage objects is an unused door. Here it is loaded in the room. The event trigger at the edge of the room doesn't expect a door so Jennifer will just walk through it.
This trophy has an unused howling animation. A matching sound will occasionally play in the trophy room but the animation itself is never executed. In the PlayStation port, this head is part of the background just like the others around it, meaning it's no longer supposed to move at all.
This jar, found in the same room, is meant to be animated but will instead remain static in this version of the game. The animation should play when you hear the bubbling sound effect.
The green dagger, as it would appear in the room. It doesn't actually loop like in the PlayStation version, instead transitioning into a blank animation to hide it. This matches the text saying "A dagger shone faintly.", rather than "It's a glimmering dagger.", used in the PlayStation version. The object itself is already in the room and you can view its animation by heading to the crate and setting RAM address 7E1A25 to 21 (preferably with the lights off).
A sprite version of the crate found in the trophy room. Somewhere along the way, it became part of the background instead.
This doll was apparently supposed to fly into the back of the room and then return. The left part shows an unused animation where the first four sprites are unique. The back-facing sprites to the right weren't added into any of the game's animations.
There's also an animation for when the doll is about to attack. It does get used in the PlayStation version.
The parrot has four sprites facing away from the camera that aren't used in any of its animations.
In addition to this, it has four unused animations, of which two are exact duplicates. It's clear that some of the bird's actions aren't fully implemented as it's never animated while inside the cage, even when it's helping Bobby find the player.
The first two animations seen here are early drafts of the crows' attack on Bobby in the slaughter room. The rest are unused variations of when they have landed on their target, using different sprite and mirroring options.
The rat and crow cages were supposed to be animated when being opened by the player, but these animations never get used.
The wardrobe in the phone room has some unused animations. In addition to showing the black robe (see further below), it would also act as a hiding place. All the needed animations were not completed (like the door closing again), so only the fully closed door sprite is ever used in-game.
These are mockups of what some of the animations look like together with those of Jennifer and Bobby.
This painting was found among the sprites that belong in the phone room.
Also in the phone room, this cup has an unused animation where it falls off the table.
There's a sprite palette table that should be used when Mary is in the phone room with the lights off. When the light switch is used it will always use the tables meant for Bobby, resulting in Mary looking really weird. To always use Mary's palettes as shown here, use the code EFEADAC8 for lights on and EFEAF6CF for lights off.
| SNES | PlayStation |
|---|---|

|
If the black robe hasn't been picked up elsewhere, you can get it from the phone room. This sprite should have been visible when Jennifer opens the wardrobe but unfortunately all of those animations are unused and so the events are conveyed through text only instead. While still unused, the sprite also exists in the PlayStation version, confirming its intended palette.
Unused objects exist for both the robe and the painting, revealing their exact placement (the wardrobe doors have been removed for visibility). The robe is using palette 5 (same as the telephone), which might have been fine earlier but it seems it was being redrawn to use palette 2 instead (used for the cup but also contains black). The shades of black are identical in both the bright and dark palette 2, indicating that this process was never fully completed.
This animation is actually used when Jennifer climbs out of the box after hiding from Bobby, but this is not normally possible since you can't enter the shed while being chased. You can use this Pro Action Replay (PAR) code to bypass said limitation: 80994C82. When Bobby is looking around the room, he'll suddenly turn around and hurry outside. If the box is entered too late, however, Bobby will keep walking back and forth, forcing the player to restart the game. So sealing this place off was most likely a quick fix for this issue.
This is a slightly different version of the plank attack animation normally seen inside the shed. Compared to the used one, it has one more frame and it uses different sprites starting at the 6th frame.
One of the bushes in the courtyard could have used this animation for some sort of spooky event.
The music room's curtain has two closing animations with unique sprites. The used animations just show the opening sprites in reverse order instead.
The library has two unused objects whose sprites are no longer in the game. Luckily, they can be found included on the disc of the PlayStation version.
It appears that some coffer was to be placed on top of the rightmost shelf and required a stool for it to be reached.
The palette for both objects remains in the SNES version and is loaded when entering the room.
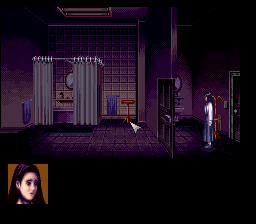
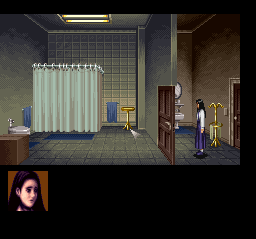
The game has palettes for a lights off version of the west bathroom. The light switch cannot be used by the player, leaving the lights on at all times.
| Unused | Used | PlayStation |
|---|---|---|

|

|

|
The box in the west bathroom reuses the inner door's palette, but it also has its own one loaded when you enter the room and that one does get used in the PlayStation version.
While the box palette is only loaded in the west bathroom, it better matches the surroundings in the east bathroom. This is how it would look if it was placed there (and if the lights could remain on).
It's worth noting that the two bathrooms has a bunch of copies of each other's objects and palettes, but none of them are different than the used copies found in the opposite room.
| Used | Unused |
|---|---|
The shelf in the middle of the mural room looks the same as the one in the library, except it has its own palette. There is a slightly different version made for the mural room that doesn't get used. The upper part has been redrawn and it lacks a shadow and as such wouldn't match the animation where it tips over, which is probably why they went with the other sprite instead.
The vase and flower in the ceremony room once consisted of these two separate sprites. They have since been replaced by a single sprite (using the same tiles) instead. The room still loads two sprite objects at the same spot but the second one doesn't display anything.
These shelves were once placed in the first purple west wing hallway. The palette is still loaded there but it doesn't really match the final appearence of the hallway. The second one also references various tiles that are no longer valid.
Unused objects reveal where they were placed. Jennifer has a few animations for climbing over these and it would seem that they were reworked for the shelf in the east storage room instead.
The doors' opening animations don't include their closed state and since most door sprites won't appear in the room until the animation starts, these sprites are never seen.
An alternative splashing animation for when Jennifer is climbing out of the cave water. The only differences are some slight timing changes on the last few frames.
| Caves | Unused | Unused | 3rd floor |
|---|---|---|---|

|

|

|

|
There are two palettes for the elevator doors that are never loaded. One of them matches the blue walls on the 2nd floor (the caves palette is reused there in-game). There's also a gray one possibly meant for the inaccessible 1st floor.
Cut Animation Frames
This box in the storage room is never fully opened, so these sprites go unused. Some other sprites also have this sort of garbage on the last animation frame, but in this case, it would be covered by the shelf that's next to it. The garbage here happens to be copied from the early Laura sprite seen below.
This should be the frame where the contents of this can start leaking out, but it was left out of all animations.
This one would be in the middle of the wall's crumbling animation, but the animation probably looks better without it.
This sprite was excluded from the doll's floating animation.
These two sprites are skipped in the animation where you flip the switches, leaving out the halfway down state for both of them.
Sprites with Unknown Palettes
The palettes of these sprites may no longer be included in their respective room sets, so they will be shown here using a simple grayscale palette instead.
| Unused | Used | PlayStation |
|---|---|---|
One of the sprites for the first bathroom looks like an early version of Laura hanging in the shower. The sprite is also in the PlayStation version, but not in good shape, so the palette may not be the originally intended one.
| SNES | PlayStation |
|---|---|
There's also a shower head sprite that's not used in the final game. A palette matching the PlayStation one has not been found.
A rat. It's not part of the trophy or slaughter room sets, so its intended location is hard to tell with certainty. Judging from the animation further down, however, it would seem to fit in the slaughter room if the cage animations had been used.
This sprite belongs to the music room, but is obviously just a placeholder.
Covered Graphics
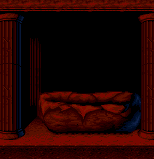
While not really unused, Dan Barrows fully covers this huge pillow/nest/bed thing which — contrary to most of the game's graphics interacting with sprites — is actually fully present.
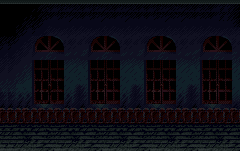
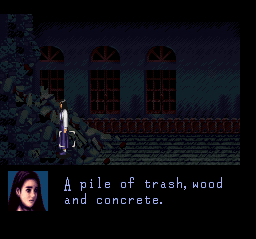
The dead-end hallways have another window behind the pile of rocks and not much else.
| Background | With sprite |
|---|---|
 |
 |
The background graphics of the hole in the west storage seem to be an earlier version compared to the object that covers it at all times.
Tileset Details
At the end of the background tiles for the East Bedroom, there's what looks like a scratchpad area where the left bed was worked on. It's different from the right bed (the one near the lights here, that is flipped in-game), mostly around the legs. In the end, a sprite was used for the left bed instead, gaining a row of some brighter pixels.
| Used tiles | Unused tiles |
|---|---|
 |
 |
There are some unused tiles in the machine room tileset that seem to depict a pillar like the one shown above.
Unused Animations with Placeholder Sprites
A whole bunch of interesting animations have been stripped of their original sprites, most likey due to space constraints. Almost all of them have been restored in later versions of the game, though often still unused. A counter has been added here to distinguish frames where needed.
| SNES | PlayStation |
|---|---|
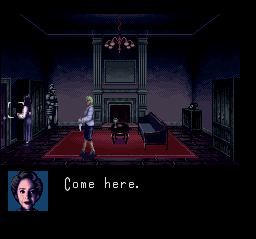
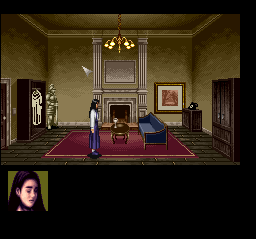
The living room was apparently meant to have an extra hiding place behind the curtains. These animations exist in all versions of the game but are never used.
| SNES | PlayStation |
|---|---|
The cabinet in the same room was supposed to be openable, but here's no way to even click on it in the final game.
| SNES | PlayStation |
|---|---|

|

|

|

|

|

|

|

|

|

|

|

|

|

|
The clown doll would have been an alternative enemy in the child's bedroom, but it had to wait for the PlayStation port before getting up on its feet, having only an idle sprite used this time around.
| SNES | PlayStation |
|---|---|

|

|

|

|

|

|

|

|

|

|

|

|
Some of the static objects were actually meant to be used as weapons, with success depending on the use of the panic button.
| SNES | PlayStation |
|---|---|
There would have been stalactites falling outside the elevator when it starts up and everything is shaking. If the sprites weren't removed, that is. The reason they seem to disappear early when falling in the SNES animation is because the 8-bit Y position wraps around to a negative value. This is avoided in the PlayStation version where the animation positions are 16-bit instead.
| Unused | Used |
|---|---|
There's only one sequence in the game where Bobby and his scissors are unlinked (no longer snapping to the same position). The right animation is from the scissors set, while the left one has its own set near some other animations meant for the last part of the game. It's similar to the PC and PlayStation versions where a special image of the scissors is used when they are thrown, rather than a normal animation. In this case however, the animation from the scissors set works just fine.
The two animations of the rat. They only exist in the SNES version.
The dreamcatcher in the child's bedroom seems to have some scrapped animations.
This one is quite a mystery. No telling where it would belong.
Oddities
This object is placed inside the shed but you can't do anything with it and it's gone in the newer versions of the game. Jennifer has some unused animations of her picking it up and the text for picking up the dagger is actually among the text meant for the shed, so it's possible this is where you were originally supposed to obtain it.
Living room painting
When the painting is about to cry blood it randomly selects either the bleeding animation or a different one that uses only a single frame of the regular sprite.
The Cut Room
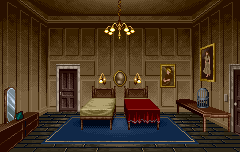
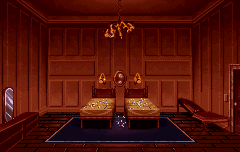
One of the rooms whose placement is randomized at the start of the game is never accessible. The door to this room is not even selectable, but the PlayStation version does add a new bedroom to fill this slot. As stated by the developers, much of the mansion was cut due to the limited number of people working on the game.[1] In fact, the room list has zeroed out pointers for a total of 12 lost rooms.
| East bedroom (SNES) | West bedroom (PlayStation) |
|---|---|
 |
 |
Missing Zombie Sequence
Sometimes, Jennifer might find a corpse inside a locker in the Trophy Room. There are two more pictures that go unused, showing the corpse coming back to life. In the PlayStation and WonderSwan versions, this zombie was put back in as a new enemy that chases you around until you put her to rest with the also-originally-unused green dagger, and thus obtaining the cage key off the body instead of finding it laying around.
On a side note, the "A dagger shone faintly." text shows that the dagger's location was fully conceived as it will later appear in the ports, as you can only find it once you turn off the light in a room and see it shining. However, while there are traces of things like the possessed clown doll still lingering in this version, the animations of the zombie moving around are nowhere to be found. Also, while the tiles for the bright eyes are present, there aren't actually any tilemaps that use them.
In this version of the game, you can't view the close-up image of the corpse until you've re-entered the room after seeing the jar fall down. This is because the game decompresses the close-up graphics for either the jar or the corpse when the room is entered. The jar close-up only needs to be shown once, so all later visits will load the corpse graphics.
Inaccessible exits
If you use the Pro Action Replay (PAR) code 7FCF3D2E and go into any room (preferably a small one), you can get into the clock tower's machine room and walk around freely.
You can climb between the two areas (although Jennifer will be climbing beside the ladder when she enters the top area on the way up). The elevator acts like a wall, but you can get past it by running into it.
Since the ending plays mostly automatically, there is nothing to click on and you can't exit through the opening to the left.
There's also an exit from the balcony leading back into the mansion. It's fully functional but since Mary is in the way you can't reach it. The hallway you return to actually has a script to take you further back into the mansion as well, but lacks a trigger for it. Instead, heading right will get you killed by Mary waiting off-screen.
The code EFADF180 will let you get past Mary on the balcony.
Hotspots
Unused Hotspot Type
The hotspots you click on will set a walking goal for the player and a script to start. One setting will have the hotspot specify those right away, while the other will provide a goal and script for both the sides it can be approached from. There is also a third setting that is never used anywhere. It specifies a goal and an index for a table of script addresses at ROM address 80831D. The only entry in the table is 808320. The script at that address does nothing more than end immediately with the opcode 00.
This may have been used earlier in development, before being replaced by the more efficient setting that links directly to the intended script.
Inaccessible Hotspots
While there seems to be nothing to do in the rubble-filled hallway in the mansion's west wing, there are actually two hotspots in that area. They are placed on the second floor, but the player must be on the lower floor to interact with them, which in turn makes that impossible. The scripts they start seem to be earlier copies of the ones used in the east wing (by the hole in the wall). The messages used for the window and the pile of junk are the same as in that area. However, Jennifer won't be climbing up to get the rock and the walking goal is further to the left.
The pile of rubble on the lower floor (shown to the right) is actually smaller but Jennifer would still be walking into it a bit.
To try these hotspots, use the Pro Action Replay (PAR) codes 7FCB8F34 and 7FCB9001 after entering this area on the second floor.
Unused Sounds
While not technically unused, the sound that the parrot makes is slightly sped-up and played with a higher pitch in-game. The original sound effect is a crystal-clear "I'll kill you."
Hidden Screens
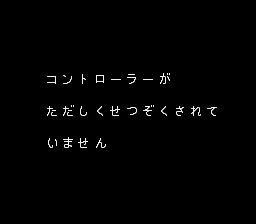
Running the game on a PAL system or connecting either a Super NES Mouse or Multitap will make these screens appear.
The Japanese text tells you the controller is not connected properly. Bobby's voice will be heard, borrowed from the elevator sequence.
Debug Menu
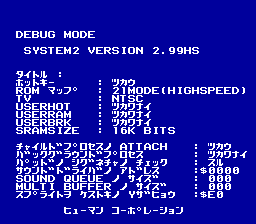
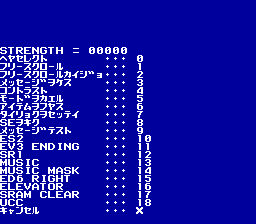
This is text for a debug menu found in the ROM, copied onto the region error screen. There is no code that references the text of the first image, but much of the code for the second one is still intact. See the notes page for instructions on how to access the debug features.
The menu works by printing text and waiting for a value to be entered. Unfortunately, the printing routine does nothing and the one that should get a value is now hardcoded to respond with a 10 right away. Other than that, the menu works as expected.
When in debug mode, the list of options is triggered by pressing L+Y. Here's what you can choose:
| Option | Prints | Effect |
|---|---|---|
| 0 | Goes to room $FFFF which would be invalid, but this actually triggers a request to instead input the ID you want. The spawn position is suitable for a small room. | |
| 1 | Enables free camera movement with the D-Pad and locks the player. | |
| 2 | Disables free camera movement and unlocks the player. | |
| 3 | Changes the screen border to the one used for Dan's reveal, showing more of the room. | |
| 4 | INPUT (0-15) | Sets the brightness of the screen. |
| 5 | 0 SILENT 1 NORMAL 2 ESCAPE |
Sets chase music status. |
| 6 | INPUT ITEM# | Adds the item you specify to the inventory. |
| 7 | Lets you set Jennifer's health. | |
| 8 | INPUT SE# (X=CANCEL) PRESS RESET |
Plays the sound effect you specify. Seems to hang each time. |
| 9 | Displays the dialogue message with the ID you enter. | |
| 10 | Takes you to the blue hallway where you meet Mary. | |
| 11 | Takes you to the lower part of the machine room. | |
| 12 | Takes you to the phone room. Mary being in there is still random. | |
| 13 | Plays the specified music track. | |
| 14 | Lets you enter a value that can mute specific audio channels. | |
| 15 | Takes you to the upper part of the machine room, entered from the right side. The room is called ED6 here but CTT in the PC and PlayStation versions. | |
| 16 | Takes you to the inside of the elevator. | |
| 17 | Clears the save file, leaving only the string "HUMAN CORP" at the top. | |
| 18 | Takes you to the caves. |
Jennifer's health would be displayed after "STRENGTH = " and the last row says that pressing X would cancel the number entering process.
Pressing SELECT in debug mode attempts to print the following:
C X=%WD($%WH) Y=%WD($%WH)
J X=%WD($%WH) Y=%WD($%WH)
F X=%WD($%WH) Y=%WD($%WH)
%WD and %WH would be replaced with the following values in decimal and hexadecimal form: cursor room position, player room position and camera room position.
The Clock Tower series
| |
|---|---|
| SNES | Clock Tower |
| PlayStation | Clock Tower 2 • Clock Tower: The First Fear • Clock Tower II: The Struggle Within |
| Android | Clock Tower: Ready for the Next |
- ↑ Szczepaniak, John (November 2015). The Untold History of Japanese Video Game Developers Vol. 2. SMG Szczepaniak. p. 305
- Pages missing developer references
- Games developed by Human Entertainment
- Pages missing publisher references
- Games published by Human Entertainment
- SNES games
- Pages missing date references
- Games released in 1995
- Games released in September
- Games released on September 14
- Games with unused animations
- Games with unused code
- Games with hidden development-related text
- Games with unused graphics
- Games with unused items
- Games with unused sounds
- Games with unused text
- Games with debugging functions
- To do
- Clock Tower series
Cleanup > Pages missing date references
Cleanup > Pages missing developer references
Cleanup > Pages missing publisher references
Cleanup > To do
Games > Games by content > Games with debugging functions
Games > Games by content > Games with hidden development-related text
Games > Games by content > Games with unused animations
Games > Games by content > Games with unused code
Games > Games by content > Games with unused graphics
Games > Games by content > Games with unused items
Games > Games by content > Games with unused sounds
Games > Games by content > Games with unused text
Games > Games by developer > Games developed by Human Entertainment
Games > Games by platform > SNES games
Games > Games by publisher > Games published by Human Entertainment
Games > Games by release date > Games released in 1995
Games > Games by release date > Games released in September
Games > Games by release date > Games released in September > Games released on September 14
Games > Games by series > Clock Tower series


