Hamtaro: Rainbow Rescue
|
|
| Hamtaro: Rainbow Rescue |
|---|
|
Also known as: Tottoko Hamtaro 4: Nijiiro Daikoushin Dechu (JP)
|
| To do: Document the newly-released prototype. |
The fourth third Hamtaro adventure game where you and the other Ham-Hams have to gather the colors of the rainbow for Prince Bo's umbrella so he can create one and return to Rainbow Land. This title was originally going to be released in North America, but was ultimately cancelled.
Contents
Debug Features
| ...But what does it mean? This game has text or audio that needs to be translated. If you are fluent with this language, please read our translation guidelines and then submit a translation! Notes: Debug menus need to be translated. |
Debug Room

There is a debug room, that looks like the Clubhouse, which can be accessed with the room selection cheat code with the ID 0001 (see Unused Rooms).
About this room:
- You always start between the "1" and the "2".
- The music played is the Clubhouse Theme.
- Unlike the Clubhouse, you can't interact with any object except the blackboard and the TV. Note that the TV only shows a black screen in the debug room.
- The top-left exit doesn't work and you just go out of the map.
- The main exit leads to the world map, but before that it asks which story flags you want to set on, from 0, none, to 7, all of them.


- Jingle is a Ham-Ham formation tester. You can see the 100 formations used during the cutscenes.

- Interacting with the "0" in the Japanese version will play the "sticker get" animation and give you one sticker at random.
- Interacting with the "0" in the European version will make all sprites disappear for a short time and give you all stickers (except the 451) and sticker backgrounds.
- Interacting with the "1" does not seem to have any effect.
- Interacting with the "2" will bring you to the Ham-Ham Lawn before giving an ingredient to Bo. In some cases it doesn't work.
Debug Menus
| This needs some investigation. Discuss ideas and findings on the talk page. Specifically: Is there a way like the Rainbow Land Debug Menu or Party Selection Menu to access the other menus? |
This game still has some functional debug menus.
It is possible to trigger any of those by setting the correct value for the next event pointer at the IWRAM's address 04:5A28 (EU) or 04:59C8 (JP), for example with the cheat code 03005A28:XXXXXXXX (EU) or 030059C8:XXXXXXXX (JP). While interacting with almost any object (e.g. talking to a Ham-Ham or picking up sunflower seeds), setting this event pointer then advancing the dialogue allows you to access the event.
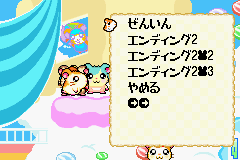
Rainbow Land Debug Menu

First dialogue box before the menu.

Second dialogue box.
Page 1

Page 2

Page 3

Page 4

Page 5


An inaccessible though active debug menu can be opened by talking to that shop hamster in Rainbow Land. One way to access it is to go in front of the "0" in the Debug Room and use the room selection cheat code with the ID 012F. In this menu you can choose:
- To deliver an invitation to a particular hamster, with a confirmation message:

- To deliver invitations to all the hamsters. In that case, you'll see this message:

- To watch the 2nd ending.
Party Selection Menu
| This needs some investigation. Discuss ideas and findings on the talk page. Specifically: What exactly do the flags do? |
Some rooms hide a green elderly Ham-Ham at the origin (top-left), which normally can't be accessible.
Either traveling to the origin; forcing him to an accessible spot; or, setting the next event pointer to 081F2E87 (EU) or 081A3277 (JP).
The first menu lets you:
- Change what Ham-Hams are in your team.
- Test formations (much like Jingle in the debug room). When quitting out, you'll be stuck on the elderly Ham-Ham.
- Change flags (Unknown what flags' purposes are).
- Warp directly to Rainbow Land's elevator (next to the train station).
The options in the team-changing menu are as follows:
| Page 1 | Page 2 |
|---|---|
| (Clear Team) | Howdy |
| Hamtaro | Dexter |
| Boss | Maxwell |
| Oxnard | Sandy |
| Bijou | Stan |
| Pashmina | Cappy |
| Penelope | Panda |
| (Next Page) | (Close) |
Note that clearing the team won't alter the first Ham-Ham you control.

The elderly green Ham-Ham; position is hacked for visibility.

Main debug menu.

Page 1 for team changing.

Page 2 for team changing.

Formation check.


Sparkle Coast Event/Team Menu
There is a debug menu for testing the events that occur in Sparkle Coast. This lets you activate some story event flags and change your party between 4 formations that are used during the storyline of this area. There are 2 pages in this menu, but oddly no connection between them, as you can't go to the second page in the first one. The dialogue parts uses Snoozer as the speaking character.
Note that all "Yep-P" and "No-P" will be replaced according to your language set.
First Page
You can trigger the first page by setting the next event pointer to 08208932 (EU) or 081B8D12 (JP).
| Japanese | Translation |
|---|---|
どのイベントの
フラグを たてるの…?

{1}	そうじ
{2}	かめたすけ
{3}	ボードだ!
{4}	いただ!
{5}	おぼれた!
{6}	クリア!
{7}	PTいれかえ1
{End}	キャンセル

{1}
かいがんを そうじしたことに
するのかい…?

{Next}	Yep-P
{End}	No-P

{Big}そいやーっ!!{/Big}
かいがんを
そうじしたことに したよ。
{End}

{2}
かめを たすけたことに
するのかい…?

{Next}	Yep-P
{End}	No-P

{Big}うっりゃーっ!!{/Big}
かめを
たすけたことに したよ。
{End}

{3}
タイショーくんが
サーフボードを
みつけたことにする…?

{Next}	Yep-P
{End}	No-P

{Big}へあーっ!!{/Big}
サーフボードを
みつけたことにしたよ。
{End}

{4}
いたを、
はこびはじめたとこまで
すすんだことにする?

{Next}	Yep-P
{End}	No-P

{Big}うっっしゃーっ!{/Big}
いたをはこんでる
ことにしたよ。
{End}

{5}
トラハムくんたちが
おぼれたところまで
すすめたことにする?

{Next}	Yep-P
{End}	No-P

{Big}ぶべらっ!!{/Big}
トラハムくんたちは
おぼれているよ。
{End}

{6}
PTメンバを
「おまかせ」じょうたいにする?

{Next}	Yep-P
{End}	No-P

{Big}ごんぶとっ!{/Big}
PTメンバを
「おまかせ」じょうたいにしたよ。
{End}

{7}
1しゅうめの
クリアフラグをたてる?

{Next}	Yep-P
{End}	No-P

{Big}ミスキャストッ!!{/Big}
1しゅうめの
クリアフラグを
たてたよ。
{End}
|
Second Page
You can trigger the second page by setting the next event pointer to 08208B5B (EU) or 081B8F3B (JP). Option 7 will do the same as option 7 in the first page. Option 8 has no text in the menu. For some reason, option 10 incorrectly uses the dialogue of option 9 at the end, saying that you switched to a 4 members team while you actually switched to a 3 members team.
| Japanese | Translation |
|---|---|
{7}	クリアフラグ
{End}
{End}
{End}
{8}
{9}	PTいれかえ2
{10}	PTいれかえ3
{End}	キャンセル

{8}
PTメンバを
「タイショーくん」
「こうしくん」
「ちびまるちゃん」の
3にんにする?

{Next}	Yep-P
{End}	No-P

{Big}べぎらまっ!!{/Big}
PTメンバを
タイショーくん ほか、
ふたりのPTにしたよ。
{End}

{9}
PTメンバを
おんなのこ 4にんぐみにする?

{Next}	Yep-P
{End}	No-P

ジョンカビラっ!
PTメンバを
おんなのこ 4にんぐみに
したよ。
{End}

{10}
PTメンバを
おんなのこ、 3にんだけに
する?

{Next}	Yep-P
{End}	No-P

ジョンカビラっ!
PTメンバを
おんなのこ 4にんぐみに
したよ。
{End}
|
Sparkle Coast Bijou's Warp
Another Sparkle Coast debug dialogue. This time it just lets you warp to the beginning of Sparkle Coast's chapter. Bijou is the speaking character.
Due to some error, the second text after your choice will appear without clearing the dialogue box, making it unreadable.
You can trigger this event by setting the next event pointer to 082084BE (EU) or 081B889E (JP).
| Japanese | Translation |
|---|---|
イベントを{Pink}しょきか{/Pink}しまちゅわ。
ハムたろうくん、 いーでちゅか?

{1}	Yep-P
{2}	No-P

{1}
わかりましわ。
{Big}いきまちゅわよ~!!{/Big}
{End}

{2}
{Pink}しょきか{/Pink}したくなったら
ここにきてほしーでちゅわ
{End}
|
Unused Rooms
All these rooms can be accessed using a cheat code:
- When you are in the game, enable this code: 03006C90:XXXX (EU) or 03006C30:XXXX (JP), where XXXX is the room ID.
- Open and close the menu.
- Disable the code.
Clover Elementary Section
5 Clover Elementary maps linked to each other are not used in the final game. There isn't any interaction in these maps, but the loading zones and links to other maps are defined, and even links with used maps.
Room 005A
![]()
- The north exit leads to room 0063.
- The west exit leads to room 005D.
- The east exit leads here:

- The south exits lead to room 005B.
Room 005B

- The north exits lead to room 005A.
Room 005C

- The west exit leads to room 005D.
Room 005D

- The north exit leads here:

- The north-east exit leads to room 005A.
- The south-east exit leads to room 005C.
Room 0063

- The south exit leads to room 005A.
| This needs some investigation. Discuss ideas and findings on the talk page. Specifically: The top-left and top-right edges of the desk trigger the climbing animation, so there may have been something that you can climb at these points that is an other exit for this room. |
| To do: Add the other unused rooms. |
Unused Items
| ...But what does it mean? This game has text or audio that needs to be translated. If you are fluent with this language, please read our translation guidelines and then submit a translation! Notes: The image descriptions and the dialogue need to be translated. |
There are 5 items never used in the final game. Each one has name, images and description in the Japanese version. In the European version, they lost their names, showing only the images and the Japanese description. All of them can be seen in the item menu with the cheat code 02001E78:000101XX, where XX is the item ID.
| Item ID | Icon | Image | Name and Description | Translation |
|---|---|---|---|---|
| 07 | 『おなかのくすり』
はたけからでてきた おちょこ。 きねんに もらったもの。 |
"Belly Medicine" | ||
| 0C | 『アフロのかつら』
あたまにかぶると アフロヘアーに なれる かつら。 |
"Afro Wig"
A wig that turns your hair into an afro. | ||
| 1A | 『いぐすり』
おなかが いたいときに のむ おくすり。 |
"Stomach Medicine" | ||
| 1F | 『ハムハムストーン』
ほうせきのように きれいな あおいろの いし。 |
"Ham-Ham Stone"
A beautiful blue stone like a gem. | ||
| 20 | 『ハムハムリング』
うでに はめる きいろの ブレスレット。 |
"Ham-Ham Ring"
A yellow bracelet worn on your arm. |
Additionally, there is an unused dialogue (in both versions) involving the "Ham-Ham Ring" and another item, the "Lucky Gold Card" (see Unused Events for more information).
Unused Events
| ...But what does it mean? This game has text or audio that needs to be translated. If you are fluent with this language, please read our translation guidelines and then submit a translation! Notes: All dialogues from those events need to be translated. |
Ham-Ham Ring Exchange Dialogue
There was an event where you would have exchanged with an Ham-Ham NPC the Lucky Gold Card for the Ham-Ham Ring. However, the Ham-Ham Ring wasn't used in the final, and this event goes unused.
Saying "Yep-P" in this dialogue gives you the Ham-Ham Ring and takes out the Lucky Gold Card of your inventory if you have it.
You can trigger this event like the other debug menus by setting the next event pointer to 081D9D70 (EU) or 0818A0B4 (JP).
| Japanese | Translation |
|---|---|
あ! それは
『{Pink}ラッキーカード・きん{/Pink}』
じゃないか!
この {Pink}ハムハムリング{/Pink}を
あげるからさ! それと
こうかんしてよ!

{1}	Yep-P
{2}	No-P

{1}
ありがとう!
よーし コンプリートまで
もうすこしだぞ!
{End}

{2}
なーんだ。
がっかり…。
{End}
|
Ah! That's the "Lucky Gold Card" ...isn't it? This is the "Ham-Ham Ring" I'll give it to you! Let's trade!
{2} No-P
Thank you! Alright! Trade complete! Just a little more!
What? That's disappointing... {End} |
Boss's Orange Dialogue Early Version
There is an event in the first chapter where you find Boss searching for the Orange on a tree and request his help. While this was used, another version of this event still is in the game, which is longer than the final one. The early version also doesn't use the orange color for the word "オレンジ".
You can trigger this event by setting the next event pointer to 08217486 (EU) or 081C7A36 (JP), but it will not always work because characters are moving during the event.
| Japanese Early | Japanese Final | Translation |
|---|---|---|
Hamtaro:
	ん? なんなのだ?

…んー、
ここにもないじぇ…。

Hamtaro:
	タイショーくん!
Boss:
	おう!
	ハム太郎たちも きたのか。
Hamtaro:
	そうなのだ!
Bijou:
	オレンジは、
	みつかりまちたの?

Maxwell:
	そのようすだと
	まだみつかって
	ないみたいですねぇ…。
Hamtaro:
	そうなのだ!
Hamtaro:
	タイショーくんがいれば
	かわを わたれるのだ!
Bijou:
	そうでちゅわ!
Bijou:
	かわの むこうがわには
	きっと オレンジが
	あるはずでちゅわ!
Boss:
	…ん?
Boss:
	なんだか よくわかんねぇけど
	オレさまのちからが
	ひつようらしいな!
Maxwell:
	オレンジが、
	かわの むこうがわにあると
	きいたのですが、
Maxwell:
	かわを わたるために
	タイショーくんのちからが
	ひつようなのです。
Boss:
	わかったじぇ!
	よーし、オレさまに
	ついて…

{Big}わああぁぁぁ…{/Big}

Hamtaro:
	お、おちたのだ…。
Maxwell:
	したに いるはずです。
	おりてみましょう!
|
…んー、
ここにも ないじぇ…。

Hamtaro:
	タイショーくん!
Boss:
	おう!
	ハム太郎たちも きたのか。
Bijou:
	{Orange}オレンジ{/Orange}は
	みつかりました?

Maxwell:
	その ようすだと
	まだ みつかっていない
	みたいですねぇ…。
Maxwell:
	みんなで ちからをあわせれば
	かわの むこうがわへ
	さがしに いけますよ!
Hamtaro:
	そうなのだ!
Hamtaro:
	タイショーくんが いれば
	かわを わたれるのだ!

Boss:
	わかったじぇ!
	よーし、 オレさまに
	ついて…

{Big}わああぁぁぁ…{/Big}

Hamtaro:
	お、 おちたのだ…。
Maxwell:
	したに いるはずです。
	おりてみましょう!
|
Sticker Hermit Dialogue Early Version
There is also an early version of the Sticker Hermit's explanations about stickers. While the final versions uses a star system to rank the stickers by rarity, this dialogue refers each rarity rank by "「レアど」?". You choose between 4 explanations instead of 5, one for each rarity, in the final. At the end of the dialogue it will loop on the final version.
You can trigger this event by setting the next event pointer to 081FB5EE (EU) or 081AB9F3 (JP).
| Japanese | Translation |
|---|---|
うんうん。 シールには
いろんな おおきさが あって
「レアど」が ついておる。
どの シールのことを
ききたいのかのぉ?

{1}	ちいさいの
{2}	ふつうの
{3}	おおきいの
{4}	すごいの

{1}
ちいさいのは 「レアど」1。
プチアクションが せいこう
したら でてくるぞい。
ハムアクションを しっぱい
したときも もらえるのぉ。
ちいさいけど いろいろと
かざりに すると とっても
たのしいのじゃ。
{End}

{2}
ふつうのは 「レアど」2。
ハムアクションが せいこう
したら でてくるぞい。
ひまわりポイントが 100に
なったら 「レアど」3の
シールが もらえるのじゃ。
おおきさは おなじじゃが
100てんの ときにしか
でない シールじゃ。
{End}

{3}
おおきいのは 「レアど」4。
ひまわりポイントが 100に
なると ときどき でるぞい。
がんばって ハムアクションや
プチアクションを どんどん
やると いいのぉ。
おみせで うっているのは
「レアど」3の おおきい
シールじゃな。
{End}

{4}
すごいのは 「レアど」5。
と~っても おおきくて
めずらしい シールじゃ。
これは だれかに もらったり
じぶんたちで さがすしか
ないのぉ。
{End}
|
Unused Backgrounds
These backgrounds are also considered as rooms, so they can be accessed using the room selection cheat code.
Rainbow Background (Room ID: 015E)

This background is located just before other rainbow backgrounds used for the introduction scene (which are rooms 015F and 0160), so it could have been used for that introduction scene too.
Cutscene Background (Room ID: 016A)

This background looks like other backgrounds used for end chapter cutscenes. However, there is no information or text that can be related to this background.
Build Date
| USA prototype | Japan | Europe |
|---|---|---|
Jul 29 2003 18:17:35 |
Apr 25 2003 01:46:25 |
Jun 30 2004 16:35:36 |
Regional Differences
| To do: Howdy’s flag for his victory animation has its color changed from Red to Blue internationally. Rip the sprites. |
Title Screen
| Japan | Europe |
|---|---|
.png)
|
.png)
|
As with past titles, both versions of the game have different title screens, each using their region's respective title and subtitle. The European version adds a literal rainbow between the two not present in the original and changes the color of the suns on the sides of the subtitle from red to yellow/orange. The European subtitle also has the colors of the rainbow in a sort of backwards order, with an extra light blue added in for most of the "w" and a repeat of red at the beginning instead of the straightforward Japanese version.
Music
Title Theme
The Japanese version of the game plays a new, longer rendition of the Japanese Hamtaro intro, "Tottoko no Uta", while the European version uses a newer version of the international theme. Unlike previous games, the Japanese theme is nearly the same length (albeit still shorter by about 10 seconds) as the international's instead of being roughly half or less.
| Japanese Title Theme | European Title Theme |
|---|---|
Character Table
Both versions of this game use the same character table. However, alphanumeric characters were redrawn for the European version (including some that were never used in the Japanese version), as well as the buttons. Most of the symbols on the extended table were slightly moved up, and some characters were added.
| Japanese Table | European Table |
|---|---|

 |

 |
The Hamtaro series
| |
|---|---|
| Game Boy Color | Hamtaro: Ham-Hams Unite! (Debug ROMs) • Tottoko Hamutarou: Tomodachi Daisakusen Dechu |
| Game Boy Advance | Hamtaro: Ham-Ham Heartbreak • Hamtaro: Rainbow Rescue • Hamtaro: Ham-Ham Games |
- Pages missing developer references
- Games developed by AlphaDream
- Games developed by Graphic Research
- Pages missing publisher references
- Games published by Nintendo
- Game Boy Advance games
- Pages missing date references
- Games released in 2003
- Games released in May
- Games released on May 23
- Games with unused areas
- Games with unused objects
- Games with unused graphics
- Games with unused text
- Games with debugging functions
- Games with regional differences
- To do
- Articles needing translation/ja
- To investigate
- Hamtaro series
Cleanup > Articles needing translation > Articles needing translation/ja
Cleanup > Pages missing date references
Cleanup > Pages missing developer references
Cleanup > Pages missing publisher references
Cleanup > To do
Cleanup > To investigate
Games > Games by content > Games with debugging functions
Games > Games by content > Games with regional differences
Games > Games by content > Games with unused areas
Games > Games by content > Games with unused graphics
Games > Games by content > Games with unused objects
Games > Games by content > Games with unused text
Games > Games by developer > Games developed by AlphaDream
Games > Games by developer > Games developed by Graphic Research
Games > Games by platform > Game Boy Advance games
Games > Games by publisher > Games published by Nintendo
Games > Games by release date > Games released in 2003
Games > Games by release date > Games released in May
Games > Games by release date > Games released in May > Games released on May 23
Games > Games by series > Hamtaro series