Proto:Burnout 3: Takedown/Promotional Disc
This is a sub-page of Proto:Burnout 3: Takedown.
| This article is a work in progress. ...Well, all the articles here are, in a way. But this one moreso, and the article may contain incomplete information and editor's notes. |
To do:
|
Burnout 3 was the name of Burnout 3: Takedown before the final Takedown subtitle was chosen. An early demo with the aforementioned original title was released to reviewers for promotional purposes. Judging by the build dates in the game's files, the demo itself was built on April 28th, 2004, with most of its assets dating back to April 13th.
Most of the differences seen in the screenshots and trailers released from February to April 2004 are present here.
Contents
General Differences
- Physics in general are noticeably different. There seems to be less gravity acting on cars, as they hug the road a bit less and even briefly pick up off the ground from time to time when respawning from crashes.
- Cars not sticking to the ground as much allows the player to flip cars onto their side and make them crash by keeping consistent pressure on the rival's door area; the game will count this as a takedown. "Flipping" takedowns can also be performed by ramping up into the back of a rival at high speeds.
- Chassis deformation behavior is entirely unique to this demo, featuring the crumpling/folding behavior of earlier builds crossed with the bending/stretching of later builds.
- Possibly as a result of this combination, the extent to which cars deform here is also far more extreme than earlier and later versions of the game alike.
- When playing the demo under normal conditions, the AI rivals are much more aggressive and intelligent when going up against the player, however they are also more prone to crashing.
- As seen in the aforementioned gameplay trailers, traffic density is higher here than the final game; this is likely why the AI tends to crash more often.
- The weight system has more of an effect on combat; light cars will struggle to take down heavy ones and be pushed around much more easily, with the reverse being true for heavier cars. Car weight still does affect combat to an extent in the final game, but not as much as cars of any size can do well in combat.
- Explosions still occur but are more subdued in appearance than the final game's. Colliding with heavy traffic vehicles such as buses also will not cause an explosion.
- As in the pre-release trailers, sound effects are quite different, with some of them being entirely different and sounds overall having a bassier, punchy resonance to them.
Gamemodes
Early versions of the gamemodes Road Rage and Crash are present in this demo, with each mode sporting various differences. They can't be played under normal circumstances; the main menu needs to be unlocked beforehand to select them.
Road Rage
- The elimination mechanic seen in the E3 2004 build is present here, with rivals being knocked out of the race after getting taken down and being replaced with a new car immediately after.
- Due to the AI spawning in whatever car the player has chosen, this mechanic does not fully work as intended.
- The visual damage element is very different; parts like bumpers, fenders and spoilers fall off cars outright as opposed to hanging off the car. This is akin to the visual damage of Burnout 2: Point of Impact's Pursuit Mode.
- Cars will emit engine smoke upon reaching Critical Damage, also mirroring B2's behavior.
Crash
- Cash Pickups spawn in this junction, albeit with their textures scrambled beyond recognition due to the circle-shaped images being mapped onto diamond-shaped objects.
- Crashbreaker behavior is very different to the final build.
- Instead of activating after a set number of wrecks, in this version the Crashbreaker is filled up similarly to Burnout Revenge. However instead of being filled up by the amount of crashed vehicles, this version is filled by tying together a large "combo" of crash maneuvers like airtime, vehicles hit, pickups collected, etc.
- Once full, activating the Crashbreaker doesn't actually cause the player's car to detonate; instead, all cars surrounding the player are detonated.
- Traffic cars do not slide around as much when in a crashed state.
- Camera behavior is the same as the final game, other than the higher speed at which the camera zips from one impact to another.
- The timer is displayed as a HUD element at all times, as opposed to the final game, which only displays the timer five seconds prior to the event ending.
Inaccessible Menus
This demo was recently discovered to contain a functional menu system, which contains a fair share of notable elements. While the menu is completely inaccessible under normal circumstances, it can be accessed via changing the title screen's value (located at hex offset 0x2920D8 for the PAL demo's ELF) from its default of 0031D8E0 to 002A4020:
20391FD8 20402A00
My Burnout
The Driver Details (then known as My Burnout) menu was completely different, sporting a set of options more akin to demo kiosk settings.
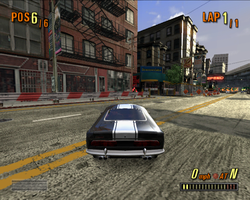
- The ContrastFilter option, just as one would expect based on its name, applies a contrast-increasing filter to the viewport.
| ContrastFilter enabled | ContrastFilter disabled |
|---|---|

|
|
- Traffic and controller vibration can be toggled on and off.
- The amount of rivals in an event can be changed (0 to 5).
- The "My Statistics" submenu is meant to display the player's total gameplay stats, but the values in this menu do not change with play.
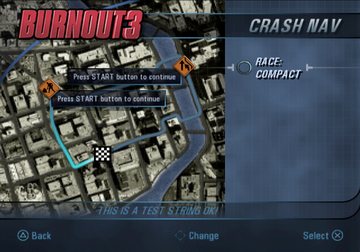
Despite the main menu option appearing to lead to it, the Crash Nav is inaccessible outside of further memory editing; change the title screen's value to 0031A570 to see it in action:
20391FD8 70A53100
Likely due to the manner in which the Nav is being loaded, attempting to play the sole event present here results in the game softlocking.
Unused Content
Unused Main Menu Text
There exists a lot of unused text that is intended for the main menu, but is never seen at any point in the demo.
Event Select
SELECT EVENT

1. Compact: Race at Silver Lake
2. Compact: Eliminator at Silver Lake
3. Muscle: Race on Downtown
4. Muscle: Burning Lap on Downtown
5. Coupe: Race on Island Paradise
6. Coupe: Burning Lap on Island Paradise
7. Sports: Race at Vineyard
8. Sports: Eliminator at Vineyard
9. Super: Race on Alpine
10. Super: Face Off on Alpine
Text for an event selection screen, likely before Crash Nav was implemented. Although it seems fitting for an E3 build, this was never used on any released demo build of the game and Crash Nav was present in the E3 build; although the third event is playable in this demo and the ninth was playable in the E3 build.
Garage Text
SELECT A CAR
ACCELERATION
CONTROL
TOP SPEED
SELECT A COLOR
AVAILABLE CARS
AVAILABLE COLORS
SELECT TRANSMISSION
Text that was meant to appear in the garage, most of which does not appear in the final game. It is not used in this demo, either, as the garage is not present. Many features from the previous game are present, including acceleration and control statistics, a separate color selection sub-menu and a transmission select.
Driving Skills
DRIVING SKILLS

2,000-FOOT ONCOMING
300 FOOT DRIFT
100 FOOT AIR
500 FOOT DRIFT
300 FOOT DRIFT
5,000-FOOT ONCOMING
300-FOOT DRIFT
100-FOOT AIR
300-FOOT DRIFT
3,000-FOOT ONCOMING
A set of challenges, called Driving Skills, would see the player complete a set of stunt-based challenges, ranging from a measly 300-foot drift to a downright silly 5,000 feet spent in the oncoming lane. For some reason, this list contains a few duplicates, with missing hyphens. In addition, a graphic related to Driving Skills is present in the final game:
These were replaced by the Takedown Trophies.
Aggressive Skills
AGGRESSIVE SKILLS

EASY TAKEDOWNS
TAKEDOWN IN A COMPACT
10 TAKEDOWNS IN A MUSCLE CAR
15 TAKEDOWNS IN A COUPE
20 TAKEDOWNS IN A SPORTS CAR
30 TAKEDOWNS IN A SUPERCAR

ADVANCED TAKEDOWNS
10 TAKEDOWNS IN DOWNTOWN
15 TAKEDOWNS IN RIVIERA
30 TAKEDOWNS IN GOLDEN CITY
10 WALL TAKEDOWNS
10 TRAM TAKEDOWNS

EXPERT TAKEDOWNS
20 BUS TAKEDOWNS
10 REVENGE TAKEDOWNS
10 PSYCHE-OUT TAKEDOWNS
20 TRAFFIC TAKEDOWNS
30 TRAILER TAKEDOWNS

CHAMPION TAKEDOWNS
100 ONLINE TAKEDOWNS
200 TAKEDOWNS IN THE USA
300 TAKEDOWNS IN EUROPE
400 TAKEDOWNS IN ASIA
2,000 TAKEDOWN TOTAL
Another set of challenges, called Aggressive Skills, would see the player complete sets of takedown-based tasks of varying difficulty, from Easy to Champion. These were also replaced by the Takedown Trophies. Graphics for these are also present in the final game:
Scrapped/Early Game Modes
Single Player Race
Two Player Race
Online Race
Quick Race
Lap Eliminator Race
Survival Race
Head-on Survival Race
Time Attack
Survival
Drift Track Challenge
Oncoming Track Challenge
Burnout Chain Track Challenge
A list of various game modes. Among these are modes which never even made it into pre-release, including Survival from the original game and quite a few challenge modes, similar to the ones later seen in Burnout Dominator. It also seems that Burnout Chaining was going to make a return from the previous game.
RACE
CRASH
CHALLENGE
MULTI-PLAYER
ONLINE
MY BURNOUT
CAR VIEWER
CHAMPIONSHIP
SINGLE RACE
BURNING LAP
LAP ELIMINATOR
SURVIVAL
SURVIVAL RACE
ROAD RAGE
FREE RUN
A second list shows that Free Run was also going to make a return from the previous game.
Early Track Names
| Early | Final |
|---|---|
| Test Track | N/A |
| US Marathon | Lakeside Getaway |
| US Point to Point 1 | Kings of the Road |
| US Point to Point 2 | Mountain Parkway |
| Vienna | Winter City |
| Euro Marathon 1 | Frozen Peak |
| Euro Marathon 2 | Coastal Dream |
| Europe Point To Point 1 | Alpine Expressway |
| Europe Point To Point 2 | Continental Run |
| Far East Marathon | Tropical Drive |
Preliminary track names that use the first game's naming scheme, including an entry for a removed test track (But can be found in June 8 2004 Build).
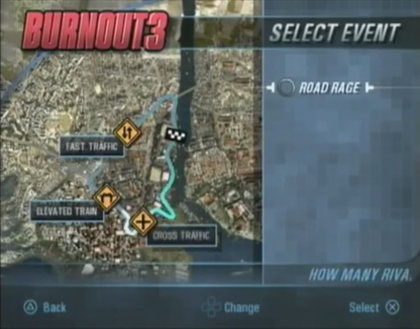
Despite being inaccessible in the demo under normal circumstances, there is a huge amount of early content used by the Crash Nav. Perhaps the most interesting of this content are the three early Crash Nav maps for each of the three geographical regions, which differ quite a bit to their final counterparts and are all partially or even substantially incomplete. Regardless of completion, all three maps have the track routes plotted out.
Early Maps
USA
| Early | Final |
|---|---|
 |
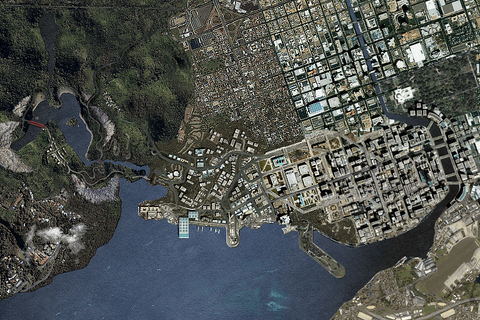 |
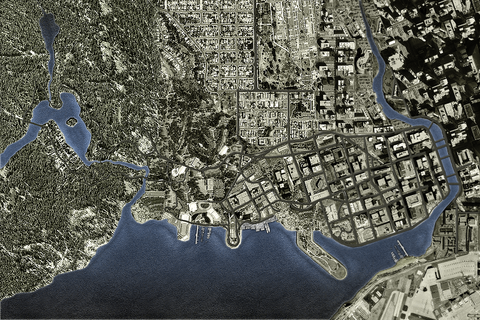
The USA map is the most complete of the three maps by a long shot, though still very different to the final version. The most noticeable difference is the early map's overall lack of color, compared to the final; in fact, the map's coloring resembles that of Burnout 2: Point of Impact's map. Another odd feature of the early map is how it seems to decrease in detail moving from right to left. On the far right, the map is rich in shadows and lots of different, somewhat unique-looking objects and buildings, whereas the far left of the map looks like 40 grit sandpaper.
Europe
| Early | Final |
|---|---|
 |
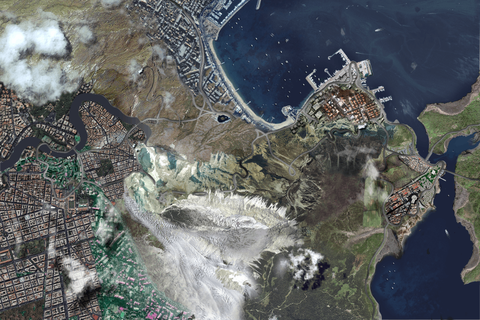 |
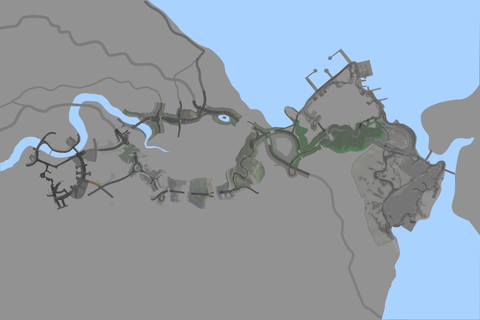
They don't get much more "work-in-progress" than this. The Europe map is definitely the most different in terms of colors. Contrary to the early USA map, the early Europe map only has the bare minimum details. All water is a very light blue, with no gradients, and almost all land is a seriously odd-looking gray color.
Far East
| Early | Final |
|---|---|

|

|
Where the Europe map was most different in terms of colors, the Far East map is the most different in terms of shape. Compared to the final map, the early map is actually rotated 180°, but has been rotated again here for better comparison. First off, the coastline at the top of the map on the early map is not present on the final one. Second, there is actually quite a lot of detail around the Dockside area, but this soon fades into a solid dark-green, showing that the artist started here and worked outwards.
Icons
There also exists very early Crash Nav icons. These icons predate those used in the E3 build, which used slightly different icons to both the demo and the final game.
| Early | Final |
|---|---|
The early race icon has somewhat strange-looking lighting applied to it, in addition to having more vibrant colors and thinner outlines.
| Early | Final |
|---|---|
The early GP icon is completely white.
| Early | Final |
|---|---|
The light blue outline on the medal icons were removed and were re-shaded to look less flat.
Text
BENDS
BRIDGE
CROSS TRAFFIC
DIRT TRACK
DOCKS
FOG
ELEVATED TRAIN
LANE CLOSED
ROADWORKS
ROUNDABOUT
SLOW TRAFFIC
FAST TRAFFIC
TOLL BOOTHS
TRAFFIC JAM
TRAMS
WET ROADS
These strings were used in labels on the Crash Nav, and would show certain features of the track on the map, like tollbooths or bridges. Unlike basically everything else on this page, many of these were used in the E3 build of the game and can be seen in an interview with GameSpot!
Two of these "feature labels" have icons leftover and, once again, unused in the demo, although they have a slightly different appearance compared to their E3 counterparts:
"Fog" and "Wet Roads" were probably never used, as they don't fit the description of any track in the game, but the rest of the labels that don't appear in the interview were probably used for tracks that weren't shown.
Early Menu FMV
Loops in the background of the main menu. Likely a temporary FMV that was used before the final version had finished production. The actual video is stretched from a 16:10 aspect ratio to fit the game's native 4:3 aspect ratio. The above video has been stretched back again to a 16:10 aspect ratio.
x3 Multiplier Pickup

|
This was probably re-purposed into the Heartbreaker, given that it is also a multiplier pickup and that it is not referenced in any way in this build.
Early Graphics
A lot of early and unused graphics can be found in the global.txd and frontend.txd texture archive files. Most of these aren't used in any released, playable version of the game and all of them appear to date to quite a while before the E3 build, considering that build uses graphics that are either much closer or are identical to the final, unlike what's here.
Finish & Checkpoint
| Early | Final |
|---|---|

|

|

|

|
Crash Pickups
A set of Crash pickup icons that were created before the Crashbreaker and Heartbreaker were implemented. All the early icons have thinner outlines, no second outline along the inside (with the exception of the Instant Boost) and brighter lighting.
| Early | Final |
|---|---|

|

|
The x2 Multiplier had its color changed from red to dark yellow.
| Early | Final |
|---|---|

|

|
The x4 Multiplier was given a slightly darker shade of green.
| Early | Final |
|---|---|

|

|
The Instant Boost was changed almost entirely, changing from blue to yellow in color and from a wheel with speed lines to a lightning bolt.
| Early | Final |
|---|---|

|

|
The Cash pickups were made much more shiny and the $ sign was made to be engraved onto the pickup instead of being a black $ sign stuck onto it.
| Early | Final |
|---|---|

|

|
The silver Cash pickup was changed in color from silver to silver blue.
| Early | Final |
|---|---|

|

|
The gold Cash pickup was also changed in color from yellow to light gold.
Medals
| Early | Final |
|---|---|

|

|

|

|

|

|
Compact Type 1 Icon
| Early | Final |
|---|---|
An icon of the Compact Type 1. This is the only car icon in the demo's files, so it was likely used as a placeholder for the other car icons in the garage. More evidence to support this is the fact that it is actually the game's default car. Note the extra decal on the car's left door, which is never seen on the car in any playable build of the game, and the brighter, blue-ish lighting.
DNAS Logo
| Early | Final |
|---|---|
The early DNAS logo is incredibly similar to the final version, with the only difference being the use of a less rounded font.
Buddy Icons
| Early | Final |
|---|---|
 |
The only icons here are the arrow and envelope icons. The envelope was changed from being opaque and white and purple in color to a white outline. The arrow, on the other hand, was changed in color from purple to white and was changed very, very slightly in shape.
HUD
Among the graphics for the HUD that are used in the demo are a few graphics that are not. These unused graphics were actually used for the Burnout 1-style boost bar seen in the earlier builds of the game. Another graphic for this boost bar, used for the bar's exterior, can also be found in the files of both the demo and the final game as health_bar.
The rounded bracket, the grey cross and the thin, grey line are all unused in the demo, but used in earlier builds.
Unused Audio
Burnout 2: Point of Impact Car Horns
| File Name | Audio | Notes |
|---|---|---|
| p1horn | The horn sound from the previous game. | |
| p2horn | Player 2's horn sound from the previous game. |
It seems the player would originally have been able to use the car's horn, like in the previous game, from which these two sound clips were taken. The first one was eventually re-purposed in the final game for Crash mode, where it can usually be heard when the player causes a big enough crash.
Placeholder Menu SFX
| File Name | Audio | File Name | Audio |
|---|---|---|---|
| gamemade | buddy_on | ||
| buddy_off | gameshut | ||
| gamestart | inv_ack | ||
| inv_dec | inv_rec | ||
| JoinedGame | mailgot | ||
| playerjoin | playerleft |
Instead of containing the sound effects used for the menus like in the final game, FE.AWD just contains a bunch of very weird placeholder sound effects. They are all placeholders for the online menu sound effects - which is why they are all unused, as the online menu is inaccessible. Most, if not all of them may have come from the RenderWare SDK, as the playerleft sound effect can actually be found (unused, once again) in another RenderWare game.


