Proto:The Legend of Zelda: Majora's Mask/Debug Version/Camera Editor
This is a sub-page of Proto:The Legend of Zelda: Majora's Mask/Debug Version.
The Camera Editor mode, accessed with Controller 3, lets you move the view and create cutscene data.
Contents
Controls
These controls apply across the different modes of the camera editor. Any controls specific to a mode will be documented there. Not all controls are guaranteed to be discovered. All of these inputs are done on Controller 3.
Note: when describing controls on this page, an ampersand (e.g. L&A) means the buttons can be pressed in any order, where a plus (e.g. L+A) means you have to press the buttons in the given order.
| Buttons | Function |
|---|---|
| START | Enter/exit the camera editor. |
| D-Up/D-Down | Select different options on the screen. |
| D-Left/D-Right | Change the settings of the selected option. |
| (L & R) + C-Up | Switch to Cut Editor mode. |
| (L & R) + C-Down | Play the currently selected cutscene (see Cut Editor mode). Note: In Viewer mode, you have to switch to Point Editor mode as the first option change you make after entering in this button combo, or it does nothing. |
Camera Controls
The camera can be moved in Viewer and Point Editor modes. Keep in mind that the controls differ slightly between the modes, but ultimately behave identically.
These following controls move the center and the eye around in space, without changing their relative positions to each other. Note that these control descriptions discuss movement with regards to screen axes, but if you've rotated the screen in Point Editor mode, then the "screen axes" rotate with the screen for the purposes of this description.
View Translation
| Buttons | Function |
|---|---|
| C-Up | Move up on the screen Y axis. |
| C-Down | Move down on the screen Y axis. |
| C-Left | Move left on the screen X axis. |
| C-Right | Move right on the screen X axis. |
| A | Move forward on the screen Z axis (into the screen). |
| B | Move backward on the screen Z axis (out of the screen). |
| L & C-Up | Move forward on screen Z BUT without affecting the space Y coordinate of either the center or the eye. |
| L & C-Down | Move backward on screen Z BUT without affecting the space Y coordinate of either the center or the eye. |
Another way of describing L & C-Up/C-Down is that they move everything forward/backward along the ground.
View Rotation
These next controls rotate different things depending on the mode and whether you're holding Z:
| Mode | Default | Holding Z |
|---|---|---|
| Viewer | Rotate Eye about Center | Rotate Center about Eye |
| Point Editor | Rotate Center about Eye | Rotate Eye about Center |
Holding Z at any time in these button combos will change what you're rotating. The way the eye and center are positioned relative to each other seems to be with spherical coordinates (see xxx), which here are referred to as the radius, and horizontal and vertical rotation. The controls are as follows:
| Buttons | Function (rotating Eye about Center) | Function (rotating Center about Eye) |
|---|---|---|
| L & A | Decrease radius (always moves Eye closer to the Center, i.e. zoom in) | |
| L & B | Increase radius (always moves Eye farther from Center, i.e. zoom out) | |
| Analog Left | Decrease horizontal rotation. | Increase horizontal rotation. |
| Analog Right | Increase horizontal rotation. | Decrease horizontal rotation. |
| Analog Up | Increase vertical rotation. | Decrease vertical rotation. |
| Analog Down | Decrease vertical rotation. | Increase vertical rotation. |
Coordinate Display
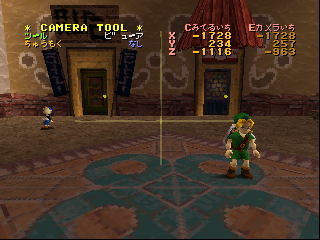
In the Viewer and Point Editor modes, a table in the top right corner of the screen shows the position of the Center (represented by the yellow axes) and the Eye (the camera, whose position determines what part of the world you see on screen). By default, this table shows the XYZ coordinates of each of these two in space. The highlighted set of numbers shows which coordinates will not change when you rotate the view, but means nothing when you're moving both the center and the eye through space. Holding Z will change how the view rotates, and thus also which set of numbers is highlighted.
Holding L in either of these modes will show you one set of "RVH" numbers instead, and an arrow between the two columns of the header. These numbers represent spherical coordinates: Radius, Vertical rotation, and Horizontal rotation. The arrow shows what the given set of numbers are transforming; either how to get from where the center is to where the eye is, or vice versa. The rotation controls move what this arrow is pointing to. By holding Z at the same time, you change what you're rotating, and thus which way the arrow is pointing. The numbers also change to reflect how to do the transformation indicated by the changed arrow.
Modes
There are three distinct modes for doing different things with the camera. This is changed with the ツール (Tool) option, whose values are:
- ビューア (Viewer)
- ポイントエディタ (Point Editor)
- カットエディタ (Cut Editor)
Viewer
This mode simply lets you move the camera around. A red camera model is put in the area to show where the camera would be if you were not in the camera editor. Nothing is edited on this screen.
Options
| Option Name | Translated | Value Type | Description |
|---|---|---|---|
| ちゅうもく | Z-Target | Enumerated | Affects whether or not you can select Z-Targetable things, and changes how the view moves when moving Link with Controller 1. |
| ちゅうもくアクター | ??? | Integer (unsigned?) | Read-only. Indicates what object is currently being Z-Targeted (?). Only shows up when アクター (Actor) is selected for the ちゅうもく (Z-Target) option. |
For the ちゅうもく (Z-Target) option, there are two choices:
| Value Name | Translated | Description |
|---|---|---|
| なし | None | No Z-Targeting. If you move Link on Controller 1, the current view stays put. |
| アクター | ??? | Z-Targeting enabled. If you move Link on Controller 1, the current view moves with Link as if Z-Targeting (note that Link's actual movements and the fake red camera do not behave as if Z-Targeting). Shows the ちゅうもくアクター option and allows the Z-Target selection controls. |
Controls
These are the specific controls for Viewer mode:
| Buttons | Function |
|---|---|
| L + Z | Only when ちゅうもく (Z-Target) is set to アクター (???). Selects the next Z-Targetable item. Changes the value of ちゅうもくアクター (???). |
| L & R & Z | Reset the view, and change the ちゅうもく (Z-Target) option to なし (None). |
Point Editor
| Japanese | English |
|---|---|
| * CAMERA TOOL * ツール ポイントエディタ |
Camera Tools Tool: Point Editor |
| Cみてるいち Eカメラいち X 0000 0000 |
C Viewpoint E Camera Position X 0000 0000 |
| デモじかん 0 | Cutscene Time: 0 |
Cut Editor
| Japanese | English |
|---|---|
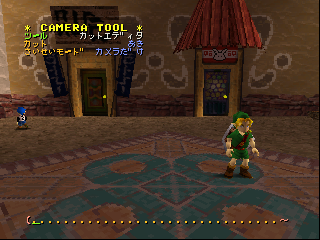
| * CAMERA TOOL * ツール カットエディタ |
Camera Tools Tools: Cut Editor |


