Super Mario World (SNES)
| Super Mario World |
|---|
|
Also known as: Super Mario World: Super Mario Bros. 4 (JP box art)
|
Super Mario World is the first Mario game on the SNES, rushed and hacked together in time for release.
Despite that, it's considered a high point of the franchise, partly due to the ridiculous amount of non-linearity and secrets within the levels. Also, Yoshi.
To do:
|
Contents
Sub-Pages
| Development Info |
| Prototype Info |
| Prerelease Info |
| Notes |
| Unused Graphics & Objects And lots of them... |
| Unused Levels Early levels that still linger in the ROM. |
| Version Differences Those dolphins had it coming. |
Unused Sound
An unused sound that would be repurposed in Yoshi's Island for when the player hits Expansion Blocks, unlocks levels, and jumps on Fat Guys. Used in the ys_romX_0 build for when the player stomps on Georgette Jellies.
Unused Level Modes
Layer 1 horizontal into Layer 2 vertical
Sprite ID: EC
When this object is put into a level, the level will start out with a horizontal Layer 1 section, then transition into a vertical Layer 2 section. It only functions in levels with the layout mode set to 05 or 06.
Translucent Levels
Level modes: 1E and 1F
The game contains two translucent level modes: one for horizontal layer 1/background levels (1E), and one for horizontal layer 1/layer 2 levels (1F). Both modes are fully functional. Their position at the end of the mode list suggests they were "hacked in" somewhat later in development.
Early screenshots showed a flooded grassy area using mode 1F, with water on one layer and ground on the other. It may have been abandoned due to the obvious lack of a background layer when using this mode, and may have prompted the later addition of a non-transparent layer 3 water mode.
Unused Background and Sprite Graphics Indexes
Object graphics indexes: A, E
Graphics-wise, index A (Switch Palace 2) is identical to index 4 (Switch Palace 1), except it uses tileset 3, which is normally used by underground levels and castles. As a result, all tileset-specific objects are scrambled, making the index mostly unusable.
Index E (Underground 3) is identical to indexes 3 and 9 (Underground 1 and 2), except it uses a forest/mountain background GFX bank. This would have allowed for above-ground rocky levels, similar to those of World 6 in the New Super Mario Bros. series.
The layer 3 image is the slow left-scrolling rocks.
Sprite graphics index: F
Index F is identical to most of the other sprite indexes, save for the SP4 GFX bank (14), which only appears in one other index (B, Switch Palace). GFX bank 14 contains the pipe, block, Bullet Bill cannon, and Yoshi Coin graphics seen in every background tileset, none of which are used by any sprite in the game. It's possible that a set of sprite graphics existed in this bank at one point during development.
Vertical Dark BG Level
Level mode: 0D
Same as 0C (horizontal dark BG level), but uses a vertical layout.
Duplicate Horizontal Layer 2 Level
Level mode: 0F
Duplicate of level mode 01 (Horizontal Layer 2 Level), but moves layers 1&2 to the subscreen.
Silver P-Switch Oddity
Pressing a silver P-Switch will turn Munchers (Map16 Tile 12F) into coins, as it does for most other enemies. None of the levels have an opportunity to do this, however.
Oddities
Older Level Layout Leftovers

A Buzzy Beetle can be found at the very end of Donut Plains 2, stuck inside a wall. Because the screen slowly autoscrolls at that point, it can never be seen, and even if it could be seen, it would just fall through the floor. This oddity does not exist in the GBA remake.
Extra Warp Data
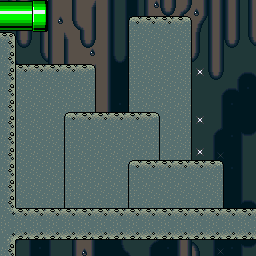
There's a pipe in Vanilla Secret 1 that leads to a secret exit. In the screen right above that one, there's warp data that takes the player to the same exit. This was done to fix a bug with the secret exit pipe: if Mario enters the pipe while riding Yoshi, he'll be just high enough (by a single pixel!) to be on the next screen up. Instead of just, say, moving the pipe down a block, they instead duplicated the warp pipe data.
Unused Red Switch Palace
Another instance of the Red Switch Palace map tile is coded into the Valley of Bowser. There's no way to reach or activate it without hacking the game. Trying to enter this level leads to Level 112, which points to the Test Level. The actual level ID of the Red Switch Palace is 11B.
Interestingly, Valley of Bowser 3 has its Enable path on secret exit value set to Left, whereas all other single-exit levels have it set to Up, implying that there was a path there at some point. Nintendo probably figured the player would have little need for red Switch Blocks by this point and (wisely) decided to make the Palace accessible from Vanilla Dome 2.
Boss Door
The door on the left is how the boss door appears in the game. The door on the right represents how the different 8×8 tiles stored in VRAM comprise the boss door. Each color is a different 8×8 tile.
Interestingly, the graphics for the orange, purple, and green tiles are identical, but are stored as separate tiles. This suggests that the door once had a much different appearance, and the purple and green tiles were originally used for something else, like doorknobs or hinges.
Overworld Paths
There are some blank tiles in the overworld graphics banks, which are drawn over the pathways Mario takes. These tiles were once used by the developers to indicate where the unrevealed pathways are.
This feature can be enabled with this patch:
| Download Super Mario World (Layer 2 IPS patch)
File: SMWLayer2.ips (28 KB) (info)
|
Reserve Starman
| In-game colors | Corrected colors |
|---|---|
 |
 |
At one point, it was possible to have a Starman in the reserve item box (though exactly how it would get there is a mystery). There is even a routine that specifically checks for the Starman item ID (03) and cycles the colors appropriately, though it appears to use incorrect palette values (00 02 04 02). Shifting each value left by one bit (00 04 08 04) fixes this.
Pro Action Replay code 7E0DC203 will force a Starman to appear in your reserve item box.
Goal Post Bottom
Though never seen in-game, Goal Posts have a bottom tile. It's likely that they were intended to float above the ground at one point, much like the similarly-styled midway points do in the final game. The rounded part was overwritten at sometime in development, but the graphics were recovered from the 2020 gigaleak here.
Unused Bonuses
Normally, the bonus table caps at 1-Up after stomping eight enemies in a row. However, due to a programming oversight, this does not apply to Wigglers! Starting from the tenth stomp, you'll receive a 2-Up, a 3-Up, and then the following unused bonuses:
- 5-Up
- 5 coins
- 10 coins
- 15 coins
- 20 coins
- 25 coins
After 25 coins, each successive stomp will overflow the bonus table and give a glitched bonus, which is often worth a very large number of points and coins. None of the unused bonuses appear correctly; the 5-Up pulls its attributes from the code following the bonus sprite attribute table, while the coin bonus graphics simply don't exist. However, they can be seen in the SNES Test Program, as shown above.
Though none of the game's levels feature more than two or three Wigglers in a row (due to their processing overhead and large sprite count), it is possible to revert them to their calm state by scrolling them off and back onscreen while floating with the cape, at which point they can be stomped on again to increase the bonus count. The easiest place to do this in the game is in Forest of Illusion 1, on the log platforms above the keyhole.
Post-Special World Galoomba
Extracting the graphic files through Lunar Magic and viewing them through YY-CHR, the GFX31, which contains the Special World changed enemies, has an unmodified duplicate of the Galoomba graphics, which are actually used by the game when the Special World has been cleared. It's possible that at one point, clearing the Special World would have made these enemies change appearance drastically just like they did on the GBA remake. They don't have similar sprites for the falling through parachutes graphics on the graphics bank however, so using non-identical graphics for the enemy in this graphic file would cause both designs to clash.
Reserve Item Drop Warp
If Mario misses picking up a falling item after releasing it from the reserve box, there is another chance to grab it. By simply waiting in the same spot for 18 minutes, the item will reappear from the top of the screen. This occurs due to the dropped reserve item's Y coordinate overflowing, making it simply restart from 0, the highest possible Y coordinate. Because of most levels' time limits, however, this can effectively only be seen in Yoshi's House.
Developer's Tools
Free Movement/Instant Flight Mode
The Game Genie code DDA6-DF07 enables a free movement/instant flight mode. Hold L and press A once, and you'll be able to fly (provided you have a cape) as soon as you start running. Hold L and press A again, and you will be able to move Mario anywhere in the stage. Hold Y to speed up Mario's movement, or press L and A again to return to normal gameplay. This was removed in the European version.
Boss Defeated Scene Select
The Game Genie code 7DBD-04AF will give you special controls during "boss defeated" scenes. After the scene has ended, press L + R to repeat the scene or Up + L + R to view the "boss defeated" scene from the next world.
Additionally, if you go past the seventh and final "defeated Koopaling" scene, you can view the credits.
Power-Up Select
The Game Genie code EDA5-0F6F enables a power-up select not unlike Super Mario Bros. 3. Hold Up and press Select to switch between Small, Big, Cape, and Fire Mario. This was removed in the European version.
Yoshi Select
The Game Genie code ED60-642D will let you choose what Yoshi you want on the map screen. Press Select to cycle through the different Yoshi colors (None, Yellow, Blue, Red, Green).
Instant Level Completion
The Game Genie codes DDC1-64DD DDC5-6DAD allow you to instantly complete any level, even ones you have not already beaten. Press Start then Select to complete the level via the "normal" route, or hold A or B while pressing Select to complete the level via the secret goal, if the level has one.
Star World from Yoshi's House
The Game Genie code EDB7-0FBD allows you to reach Star World from Yoshi's House. Press Select while on Yoshi's House to be transported to Star World 1.
Overworld Free Movement
The Game Genie codes 0ABB-6D9D CEBB-6DBD B4BB-6D2D allow you to walk on not-yet-revealed paths and enter not-yet-revealed levels. However, you cannot pass through locked doors.
Used but Hidden Content
Invisible 1-Up Triggers
Super Mario World has a little-known category of secrets, where having Mario touch four invisible and silent trigger points in a level in the correct order will cause a 1-Up to spawn.
The only way to discover these in-game is to stumble across them by chance (some are much more obscure than others), but Lunar Magic's level editor will show their locations on maps that include them.
The four hidden 1-Up triggers comprise Extended Objects 19-1C.
There are 15 of these accessible in the game:
| Level ID | English Level Name | Location |
| 006 | Donut Plains 4 | 
|
| 010 | Cookie Mountain | 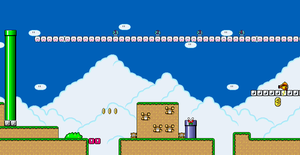
|
| 015 | Donut Plains 1 | 
|
| 01A | #6 Wendy's Castle | 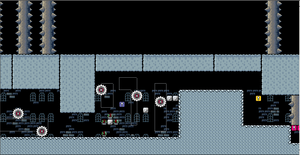
|
| 024 (Address: 0x36BFB) |
Chocolate Island 2 | 
|
| 0E0 | Vanilla Fortress | 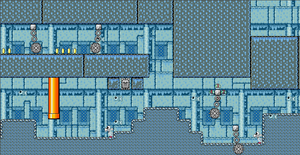
|
| 0E7 | #2 Morton's Castle | 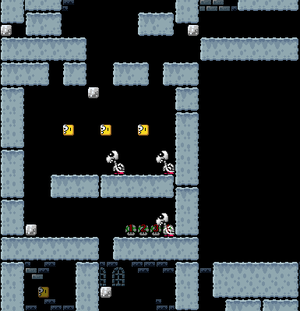
|
| 102 | Yoshi's Island 4 | 
|
| 107 | Vanilla Ghost House | 
|
| 110 | #7 Larry's Castle | 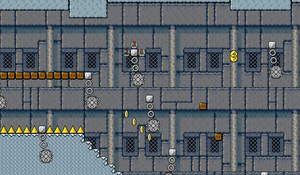
|
| 119 | Vanilla Dome 4 | 
|
| 123 | Forest of Illusion 3 | 
|
| 12A | Gnarly | 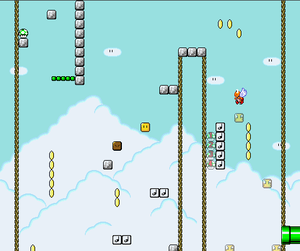
|
| 1E3 | Valley of Bowser 2 | 
|
| Various | 'TEST' Map | 
|
"Valley of Bowser 2" is the only level to contain more than one set of triggers (other than the unused "test" maps), but once one has been collected, the other is deactivated as well.
Big Boo Peek Frame
It's relatively well known that if you stare down a Boo Buddy for approximately eight (real-time) seconds, it'll briefly make a face at you. (These frames are also used for other Boo-related enemies, like Circling Boo Buddies.)
However, less widely known is that Big Boos also have a similar behavior. They, however, require you to wait for approximately 16 real-time seconds before reacting, double the time.
Big Red Dot Levels
The popular theory of levels that are represented as a big dot in the overworld map is that these are long levels, but some levels don't actually meet this criteria. Big red dotted levels actually seem to represent big split points, meaning they have secret exits leading to alternate routes that have fortresses which can't be reached through the main route:
- Vanilla Dome 1 leads to the route where Vanilla Fortress is.
- Forest of Illusion 1 leads to the route where Forest Fortress is.
- Valley of Bowser 2 leads to the route where Valley Fortress is.
None of this applies to the only yellow big dotted level in the game, Vanilla Dome 3, which still remains a mystery.
The Yoshi series
| |
|---|---|
| Yoshi's Island | |
| SNES | Super Mario World 2: Yoshi's Island (Prototypes) |
| Nintendo 64 | Yoshi's Story |
| Game Boy Advance | Yoshi's Island: Super Mario Advance 3 • Yoshi Topsy-Turvy • Yoshi Sample |
| Nintendo DS | Yoshi's Island DS (Demo) • Yoshi Touch & Go |
| Nintendo 3DS | Yoshi's New Island • Poochy & Yoshi's Woolly World |
| Wii U | Yoshi's Woolly World |
| Puzzle Games | |
| NES | Yoshi • Yoshi's Cookie |
| SNES | Yoshi's Cookie (Prototype; Kuruppon Oven de Cookie) • Tetris Attack |
| GameCube | Nintendo Puzzle Collection |
| Game Boy (Color) | Yoshi • Yoshi's Cookie • Tetris Attack |
| Super Mario World | |
| SNES | Super Mario World • Yoshi's Safari |
| Game Boy Advance | Super Mario World: Super Mario Advance 2 |
- Featured articles
- Featured main articles
- Pages missing developer references
- Games developed by Nintendo EAD
- Pages missing publisher references
- Games published by Nintendo
- Games published by Hyundai
- SNES games
- Pages missing date references
- Games released in 1990
- Games released in November
- Games released on November 21
- Games with unused areas
- Games with unused code
- Games with unused enemies
- Games with unused objects
- Games with unused graphics
- Games with unused items
- Games with unused sounds
- Games with debugging functions
- Games with regional differences
- Pages with a Data Crystal link
- To do
- Mario series
- Yoshi series
Cleanup > Pages missing date references
Cleanup > Pages missing developer references
Cleanup > Pages missing publisher references
Cleanup > To do
Games > Games by content > Games with debugging functions
Games > Games by content > Games with regional differences
Games > Games by content > Games with unused areas
Games > Games by content > Games with unused code
Games > Games by content > Games with unused enemies
Games > Games by content > Games with unused graphics
Games > Games by content > Games with unused items
Games > Games by content > Games with unused objects
Games > Games by content > Games with unused sounds
Games > Games by content > Pages with a Data Crystal link
Games > Games by developer > Games developed by Nintendo > Games developed by Nintendo EPD > Games developed by Nintendo EAD
Games > Games by platform > SNES games
Games > Games by publisher > Games published by Hyundai
Games > Games by publisher > Games published by Nintendo
Games > Games by release date > Games released in 1990
Games > Games by release date > Games released in November
Games > Games by release date > Games released in November > Games released on November 21
Games > Games by series > Mario series
Games > Games by series > Yoshi series
The Cutting Room Floor > Featured articles
The Cutting Room Floor > Featured articles > Featured main articles
