This is a sub-page of The Simpsons: Hit & Run.
Due to its rushed development, an obscene number of overlooked details remain throughout the game. Many of these details were forgotten to be updated and show how the game looked in its earlier stages. While this would normally be bad news, it's basically heaven for us.
Sub-Pages
| Overworld
Those uneven oddities were bought to you by the Krusty Brand Seal of Approval! |
Filename Oddities
- Inside scrooby2/resources/images/minigame contain icons used for the talk interaction to characters, but they are all separated into normal, mad and sad despite all using the same graphic.
- Some filenames and certain textures imply that Buzz Cola wasn't originally Buzz Cola, but rather known as Human Cola, and the Buzz Cola plot point wasn't decided upon until later in the game. This makes the level 5 billboard which reads "Buzz Cola - For Humans." make a little more sense as a joke with the original name.
| humancola.tga
|

|
Main Menu Oddities
- The Main Menu contains a texture for a very early skybox for Level 1. This early skybox can be seen very briefly above the Simpsons' House in the game's intro movie that plays on startup, right after the camera flies through the Simpsons logo and into the Wasp Camera's point of view. It is also seen in the source code images for the game.
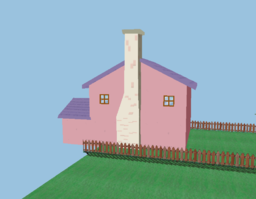
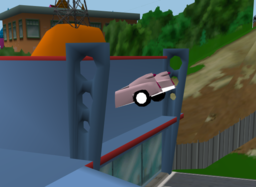
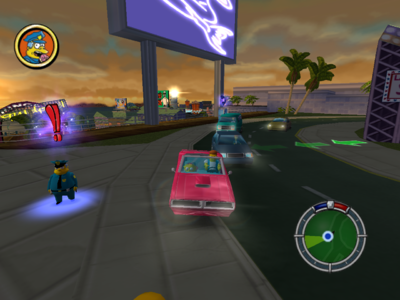
- The color of the chimney on the Flanders house is white when viewed from the main menu, the scrapbook, and the interior of the Simpsons house. When viewed in the actual level itself, the color of the chimney is pink. Prerelease screenshots show the chimney as white, suggesting the color of the chimney was changed late in development.
| Main Menu
|
In-Game
|
|

|
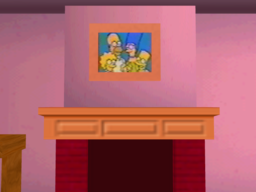
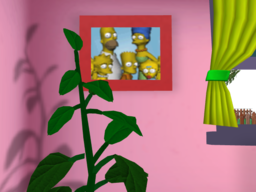
- There are two different versions of the Simpsons family portrait in the main menu: One that is hidden out of view of the camera which uses the character's designs from the show, and another one that is in view of the camera that uses pre-rendered Road Rage models.
| Hidden Portrait
|
Visible Portrait
|
|
|
- While it can't normally be seen, the house facing 742 Evergreen Terrace has a gate in the main menu, whereas in-game, it does not. This appears to be a leftover of an earlier version of the game, as the Sizzle Reel demo shows a gate in front of the house.
| Main Menu
|
In-Game
|

|

|
- The fence separating the Simpsons' and Flanders' houses appear to differ in-game and in the main menu; The main menu has the fence as picketed and brown in color, while the in-game fence is squared and khaki in color. The opening cutscene also has the picket fences used around the Simpsons' house, whereas the Powers' House uses the squared fences used in the final game.
| Main Menu
|
In-Game
|

|

|
Scrapbook Images
The scrapbook images for each level were taken from earlier designs of every level. While developer Jeffrey Pidsadny stated in an interview that the images were staged shots composed solely for the scrapbook, these were obviously made before the earliest Sizzle Reel demo was released. Most of the images lack a background design, and instead feature a colored sky to represent the time of day. The only exception to this is Level 2 and Level 4's images; Level 4's seems to be an earlier, cloudier skybox.
Level 1
| Level 1 Scrapbook
|
Level 1 Final
|

|

|
- The Evergreen Terrace sign is in front of the garden of the house facing 742 Evergreen Terrace. The driveway to this house appears to be completely missing, although the path to the right of it is still there.
- The evergreen trees behind and around the house as well as the shrubs have a different design. The textures for the trees and shrubs are still used for the bonus race of Level 1.
- The Flanders' house has a different colored chimney, and the shrub designs are different.
- There is a grey streetlamp where the phonebooth is in the final game. The streetlamps seen around Evergreen Terrace are green in the final game.
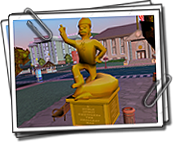
Level 2
| Level 2 Scrapbook
|
Level 2 Final
|
|

|
- The Statue of Jebediah Springfield is facing the City Hall rather than the Court House.
- The skybox suggests that the level originally took place around sunrise or sunset (consistent with an early piece of concept art found on the PR Assets disc); this was likely changed due to the story of the level requiring the time of day to match Bart being truant from school.
- The benches and dust bins are in different shots.
- A tree is missing in the scrapbook image.
Level 3
| Level 3 Scrapbook
|
Level 3 Final
|
Road Rage model
|

|

|
|
- The unused gag of Moleman's Cadillac can be seen facing out of Planet Hype. While the Cadillac's model is missing from the final game, the one seen in the picture appears to have been lifted from The Simpsons: Road Rage and edited slightly - The scrapbook image lacks the top lights, the bumper and rims are different, and the color is brighter overall.
- Burns' Casino can be seen at an angle different to that in the final game.
Level 4
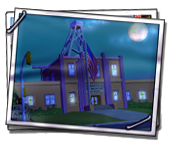
| Level 4 Scrapbook
|
Level 4 Final
|
|

|
- The Springfield Elementary School's sign is different and appears to be the same as the sign on the top of the entrance.
- The lighting of the windows is in different places and not as bright as it is in the final game.
- The traffic light is slightly further left in the scrapbook image. The phonebooth is also missing.
- The moon is smaller and northeast, rather than large and centered.
Level 5
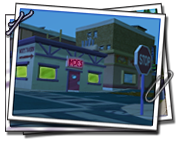
| Level 5 Scrapbook
|
Level 5 Final
|
|

|
- The time of day appeared to be different in the image, appearing as a sort of early morning or "gloomy day". It also somewhat matches up with the Contest List.doc in the source code leak.
- The windows of Moe's Tavern lacks bars.
- There is a STOP sign not found in the final game.
Level 6
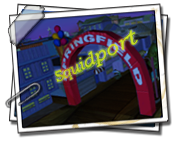
| Level 6 Scrapbook
|
Level 6 Final
|
|
|
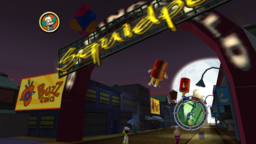
- The Squidport text on the sign is using a different font.
- The Squidport sign is facing north rather than south in the scrapbook image.
- The buildings' windows are not lit up and the Buzz Cola banners and balloons are missing.
Level 7
| Level 7 Scrapbook
|
Level 7 Final
|
|
|
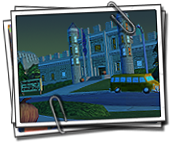
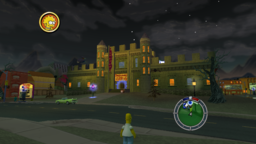
- Level 7's image features the earliest version of the level. The lighting and color of the school and the area around it appear to be blue, rather than orange.
- The skybox of the level is greenish-yellow, much like early prerelease screenshots of Level 7's unused background, and most of the houses surrounding the left of the school and prison are missing.
- The broken bus seen in the school's sandbox pit is found parked in front of the school.
- There are trees surrounding the west wing of the school not found in the final game. There is also a tree that uses the early Level 1 design just near the school bus.
- There are two additional pumpkins - one near the steps leading to the main door of the school, and another across the street.
- There is a streetlight near the school bus not seen in the final game.
- The spider hanging from the top of the east wing is missing.
- As with the Level 4 screenshot, the phonebooth is missing alongside the parking area.
- The school's sign is completely different, being square-shaped and lacking a bulletin board.
HUD Icons
| To do:
Get textures and models for comparison. |
- Several of the HUD Icons appear to be much different than the actual models used. While these might be errors, a few of these appear to be taken from an earlier version of the game.
- The icon for Rod's inhaler in "Petty Theft Homer" is orange and brown in color, but the model used in-game is blue and navy.
- The icon for Burns' Manor has a white door, rather than brown like in-game.
- The icon for Moes's lacks window bars in its icon, as consistent with the Level 5 scrapbook image.
- The icon for Springfield Elementary has a longer and more detailed staircase than in-game. In addition, the flag pole is completely absent.
- The font used for the Try-N-Save's sign is different both in-game and in the icon.
- The icon for Springfield Police Department lacks the lamp-posts and trees surrounding it in-game.
- The three-eyed fish in "Fishy Deals" are orange in the icons, but green in-game
- The icon for The Itchy and Scratchy Store has different signage and a clearer solar panel.
- The icon for Springfield Retirement Castle has signage on the roof and the patio appears to be wider than in-game.
- The icon for Legitimate Businessmen's Social Club has a different fire exit.
- The icon for Lexicon Bookstore lacks a loading bay as well as the signage above it.
- The icon for Springfield General Hospital has signage on the roof.
- The icon for the C-Spanker has the rear reusing the textures from the Taffy Shop instead of the Monorail, as consistent with the model used in Level 3's Bonus Race stage.
Phonebooth Icons
- Several of the icons for cars in the phonebooth appear to use earlier pictures of the cars.
- The icon of the Malibu Stacy Car has the car's headlights hidden, a white interior as opposed to a pink one, and unique rims completely different from those in the game. The unused wheels can be found in the texture files for the car.
| Phonebooth
|
In-game
|

|

|
- The icon for Moe's Sedan has different rims on the back right tire. The earlier rims can be found in the texture files.
- The icon for the Bandit has different rims different from those in-game. This picture appears to be similar to a prerelease picture of the car found in the PR discs.
Bonus Game
- A considerable number of Bonus Game tracks seem to have been forgotten about when their respective levels were edited, as several things reflect an earlier build of the game.
- Level 1's Bonus Map contains an earlier version of the shrub texture that closely matches pre-release footage and the Scrapbook level preview. Compared to the main game's shrub texture, it is nearly identical except for using darker shades of green.
| Bonus 1 Shrub Texture
|
Level 1 Shrub Texture
|

|

|
- Level 1's Bonus Map also contains an earlier version of the evergreen tree model that's much rougher looking than the model used in the main game. These trees are the same ones used in the scrapbook photo and the Sizzle Reel footage.
| Bonus 1 Evergreen Tree
|
Level 1 Evergreen Tree
|

|

|
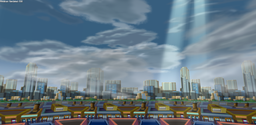
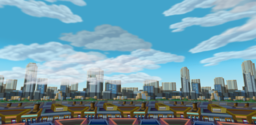
- Level 2's Bonus Map uses an earlier skybox seen in pre-release footage with an animated sun not present in the main game, more clouds and an overall darker sky than the main game's skybox, different textures for the scrolling clouds, and light beams coming down from the clouds also not present in the main game.
| Bonus 2 Skybox
|
Level 2 Skybox
|
|
|
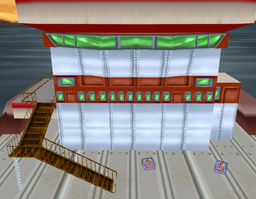
- Level 3's Bonus Map contains an earlier version of the C-Spanker with less detail than the main game. It has a near-finalized layout but is missing one of the major shortcuts. The ramp on-board the ship that leads to said shortcut also uses a different texture.
| Bonus 3 C-Spanker
|
Level 3 C-Spanker
|

|

|
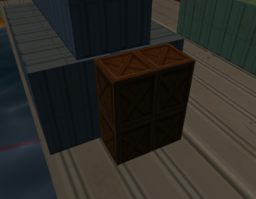
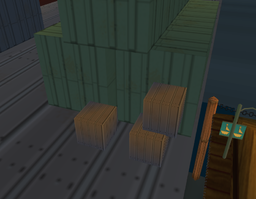
- Level 3's Bonus Map also has the crates on-board the C-Spanker used to climb onto the shipping container with the Bonus Vehicle in a different location, suggesting the Bonus Vehicle was once in a different location in the main game. Said crates are also using a different texture.
| Bonus 3 Crate Location
|
Level 3 Crate Location
|
|
|
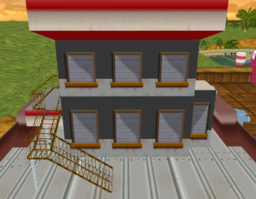
- The rear of the C-Spanker in Level 3's Bonus Map is considerably different from how it appears in the main game. The biggest difference is that textures from the Taffy Shop are used instead of the Monorail textures, the walkway of the staircase uses the texture of the hand-railings, and the hand-railings are slightly taller. Overall, the rear of the C-Spanker isn't as wide as it is in the main game.
| Bonus 3 C-Spanker Rear
|
Level 3 C-Spanker Rear
|
|
|
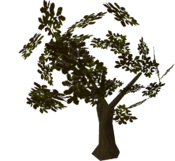
- Level 5's Bonus Map contains an earlier version of the common large tree model that is used throughout Levels 2 and 5. The trunk and branches are mostly the same, albeit less detailed, but the leaves are considerably different.
| Bonus 5 Large Tree
|
Level 5 Large Tree
|
|

|
- Level 5's Bonus Map also contains earlier versions of the Itchy and Scratchy floats seen in Levels 2 and 5. The main difference is that they have red gloves instead of white gloves, the Scratchy float has its tail facing a different direction, and their proportions and sizes are ever so slightly different.
| Bonus 5 Floats
|
Main Game Floats
|
 
|
 
|
- Level 6's Bonus Map also uses an earlier skybox seen in pre-release footage with scrolling clouds not present in the main game, slightly different colors for the sky, an ocean that's considerably bluer than the main game's skybox, and a reflection of the moon in the ocean that sparkles which is completely missing the sparkling effect from the main game.
| Bonus 6 Skybox
|
Level 6 Skybox
|

|

|
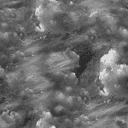
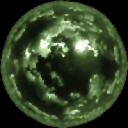
- Within the files for each Bonus Map is an earlier version of the Environment Map texture that's vastly different from the version used in the main game. Because of this, the reflections on the vehicles look slightly different in the Bonus Game than they do in the Main Game.
| Bonus Environment Map
|
Main Game Environment Maps
|
|
|
Other oddities
Level 3
Bandit Oddity
| The Bandit in level 3
|
|
- When driving Snake's car, The Bandit, he will appear in the drivers seat, this is true even for Slithery Sleuthing, whereupon two Snakes will be visible at the same time.


