Thunder Fox (Arcade)
| Thunder Fox |
|---|
|
Developer: Taito
|
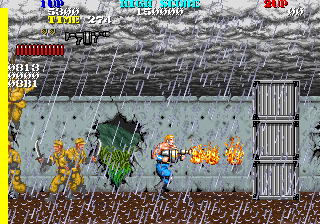
Thunder Fox is a game about shooting, stabbing, and somersaulting a terrorist organization led by the Bionic Commando.
Contents
Debug Functions
Round Select

This game uses the Taito Code:
- While the game boots up, hold the Service Coin button until the "SERVICE SW ERROR" message pops up on the screen.
- Then, press 1P Start (x3), Service Coin, 1P Start. The stage select menu should then appear.
Use 1P Joystick to select a round and 1P Start to start the game.
Debug Dip Switches
Dip switches A-1 and B-4 are normally ignored, but if ROM address 0x3FF80 is set to a non-value, flipping both dip switches enables a few debug functions. Place this code in MAME's thundfox.xml cheat file to reactivate those dip switches:
  <cheat desc="Enable Debug Switches">
    <script state="run">
      <action>maincpu.mw@03FF80=0x0001</action>
    </script>
    <script state="off">
      <action>maincpu.mw@03FF80=0x0000</action>
    </script>
  </cheat>

The following features are available:
- The X and Y position of the camera, and 1P's current X position, are displayed in the middle-left part of the screen.
- Pressing 2P Start will toggle a pause feature. When the game is paused, pressing 1P Start will advance the game by one frame.
- An 8x112 pixel line is placed on the left side of the screen. This acts as a CPU usage meter: It's normally black but will turn red, yellow, white, etc. depending on how slow the game is running.
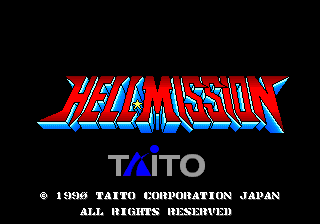
Old Title Screen

|

|
An older title screen with an alternate game name, "Hell Mission", can be accessed in place of the game's attract mode by placing the following code in thundfox.xml:
  <cheat desc="Old Title Screen">
    <script state="run">
      <action>maincpu.mw@002166=0x4CE0</action>
    </script>
    <script state="off">
      <action>maincpu.mw@002166=0x4186</action>
    </script>
  </cheat>
Unused Graphics
To see any of these unused sprites in-game, place the following code in MAME's thundfox.xml cheat file and replace YYY with the appropriate three-digit frame number:
  <cheat desc="Change Life Sprite">
    <script state="run">
      <action>maincpu.mw@035ECE=0x0YYY</action>
    </script>
    <script state="off">
      <action>maincpu.mw@035ECE=0x05AD</action>
    </script>
  </cheat>
This will replace the life pick-up with a different sprite.
General
Tile IDs: 41-5A (Mask graphics ROM #2)
A full set of lowercase characters in the same style as the rest of the game's text. All messages and dialogue in this game are in all-caps.
| Early | Final |
|---|---|
 |
 |
Tile IDs: 2A21-2B36 (Early - BG/FG ROM #2), 2C36-2E23 (Final - BG/FG ROM #2)
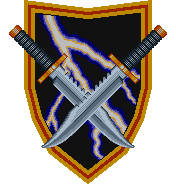
An earlier version of the emblem used in the high score screen that's missing the stripes from the border and a lightning bolt in the top-right corner. The knives were later drawn larger, with an outline along the serrated edge to keep the two knives from blending together.
Frame ID: 1CA
A pickup sprite for the knife, the character's default weapon. Why this would be needed is unknown; there are no bare-fisted sprites of the player in the object graphics ROM.
| Early | Final |
|---|---|
Frame IDs: None (Early), 3F3 (Final)
Two different sprites for the health item. The first is located much earlier in the object graphics ROM than the other two, and might have been changed to avoid complications with the International Committee of the Red Cross. The second is just a preliminary, smaller version of the final sprite.

Tile IDs: 60-7F (Mask graphics ROM #2)
Labels for six different weapons; the top halves of these labels are missing. They appear to read "Bazooka", "Bomb" (Grenade), "Firegun" (Flamethrower), "Hondgun" [sic], "Knife", and "Machinegun".

Frame IDs: 3F5 (Down arrow 1), 3F6 (Up arrow 1), None (Other)
These sprite-based arrows are used to point out boss weak points. They only use a single frame of animation in the final game, and the left-facing arrow is entirely unused.
 
|
Frame IDs: 54A-552 (Intact), 0E7-0E8 (Busted)
A machine with a big glowing light and illegible text on a pole. What is its purpose? Is it monitoring something?
The frame table supports 48, 64, and 80 pixel tall variants for the intact version, but only supports 48 and 64 pixel tall versions of the broken machine.
 
|
Frame IDs: 0E7-0E8 (Danger sign), 0EB-0EC (No entry sign)
"Danger" and no entry signs in both intact and damaged forms. They're not kidding about the danger.

|

|

|
Frame IDs: 0BC-0BF (Walking), 0A8-0AC (Swinging), 0B0-0B2 (Jumping)
What appears to be an unused boss takes up a significant amount of the object graphics ROM. He looks a lot like the final boss, only he's wielding a trident instead of a grappling hook. His sprites are stored directly after the final boss in the ROM, so this doesn't seem to be an early design for him.
![]()
Frame IDs: 14D-14E, 150-151, 153-154
Multiple angles for the head of the boss's trident. Based on other sprites, the boss would be able to shoot the head of the trident at the player. Frames 3, 6, and 9 are not referenced in the code, but would fit in slots 14F, 152, and 155, which are otherwise null.

|

|
Frame IDs: 3F8-3FB (Crouching), 3FC, 3FD (Guarding)
Like the final boss, this trident-wielding fellow would be able to crouch down and either attack the player or guard against the player's attacks.

|

|

|
Frame IDs: None
Also like the final boss, the player would initially find them sitting down in a chair of some sort, though the sprites of the trident man getting out of the chair and hanging onto something are unique to this character.


Frame IDs: 0B3 (Hurt, no blade), 0B4 (Hurt, blade), 0AD-0AF (Dead)
There are two versions of the boss taking damage, one with the trident's blades and one without. His death animation always lacks the blades.
Round 1
| Early | Later |
|---|---|

|

|
| Final | |
Frame IDs: None (Early), 373-374, 5CA (Later)
The tank boss at the end of Round 1 went through three different designs. The first two are sprites and are drawn straight-on, while the final version was changed into a foreground element that's always seen from the side.
The earliest design for the tank's base uses relatively less complicated shading, has only two frames of animation. The second design changes the shading to make the tank appear more worn and adds a third frame of animation.
| Early | Later |
|---|---|

|

|
| Final | |
Frame IDs: None (Early), 5A9 (Later)
All three iterations have their own broken-down sprite. The second design looks the most beat up, with much more extensive damage done to the tank's frame and one of the tank's treads torn clean off.
| Early |
|---|
 |
| Final |
 |
Frame IDs: None (Early), 280-284 (Final)
The first design has a different set of tank gun graphics, while the second and third designs share the same set. Besides the same shading changes as the tank base, the only difference is the position of the skull emblem and the slightly different cannon lengths in two of the turning frames.
| Early | Final |
|---|---|
 |
 |
Frame IDs: None (Early), 299 (Final)
The busted tank gun is more beat up in the second and third designs.
| Early | Final |
|---|---|
 |
 |
Frame IDs: None (Early), 1CC, 290-291 (Final - Upward), 286, 294-295 (Final - Downward)
The tank barrels tilt further up and down in the earlier design. The downward firing animation has a proper three free animation in the earliest design, while the newer firing animation only has two frames. The upward firing animation is unused in the final game; the tank can only fire at a downward angle.

Frame IDs: 4C1-4C2 (Early & Final)
The animation of the cannon firing straight forward is the only set of sprites that's shared by all three iterations of the tank. Despite that, it's unused in the final game.
The Round 4 boss has an oddly placed and strangely colored laser cannon. This was actually meant to be put on the earliest tank design; the sprite blends in perfectly with the top of the tank gun, and the tank's brown and red palette fits much better than the yellow and gray palette used in the final game.

Frame IDs: 5AE (Broken cannon), None (Fragments)
This broken version of the tank's cannon and the cannon fragments are totally unused.

![]()
Frame IDs: 5B3, 5B5-5BC (Intact), 5B4 (Broken)
The earliest version of the tank would also have a miniature turret placed somewhere on its frame. This is a different turret than the one seen in Round 2; it uses a different set of sprites and has nine degrees of movement instead of five.
Not sure what these are, but the fact that they have no frame data means that they're likely meant to be placed somewhere on the earliest tank design.
Round 2
| Used | Unused |
|---|---|
Frame IDs: 287-28C
The mini-turret on the Round 2 mid-boss has five degrees of movement, but only the one on the left is used.
The message "Lucky Angel" is written on six missiles at the end of Round 2. This alternate version that says "Dear Friends" is unused.
Round 3

|

|

|

|
Frame IDs: 2FF, 3D6 (Buoy), 301 (Boat), None (Raft, ocean marker)
Four unused objects for use in the jet ski section: A buoy, a boat (Exact palette doesn't seem to be in the game anymore), a life raft, and an ocean marker.
| Early | Final |
|---|---|

|
Frame IDs: None (Early), 300, 3D8 (Final)
There's one sprite of an older mine design left in the object graphics ROM. This mine is gray instead of bright orange and is smaller than the mines used in the final game.
Sprites of a frogman firing a rifle. The lower half of their body is missing; this guy might have been meant to be placed in the unused boat, firing at the player from the right edge of the screen.
While the frogmen use the same heavily armed jet skis as the player(s), they never actually fire anything while riding.
Round 4
It's a big green bush. Would enemies hide in the bush? Almost certainly.
An unused stalactite which would do the typical video game stalactite thing.

Frame IDs: 134 (Filled), 549 (Empty)
The excitement continues with these unused mine carts, which would either be filled with coal or air. This is supposed to take place in a mining facility, after all.
A platform that would take the player further down into the mine. This round is flat in the final game, so this platform isn't needed. Again, this is probably not the intended palette but is the closest fit left in the game.
Round 5
A large armored (but apparently unarmed) military vehicle with a camouflage pattern. That's pretty much it.

Tile IDs: 257E-2621, 26A3-26B5 (Intact - BG/FG ROM #1), 2622-26A2 (Wrecked - BG/FG ROM #1)
Similar to the Round 1 boss, the developers converted this vehicle from a sprite to a foreground element, adding graphics for a wrecked version before abandoning it entirely.
A smaller version of those blinking machines that control the hanging spike blocks later in the round.
| Early | Final |
|---|---|
 |
 |
Frame IDs: None (Early), 2ED, 4AB (Final)
Speaking of, those spike blocks were originally flat on top, with the player able to stand on top of them.
| Used | Alt |
|---|---|

|

|
Frame IDs: 2C2 (Used), None (Alt)
A different elevator design can be found in the object graphics ROM. Strangely, this is placed after the design used in the final game, which suggests they might have been planning to replace it but then decided against it. There's no palette that perfectly fits this alternate design.
Unused Area
| In-Game |
|---|
 |
| Full |
 |
The sewer section in Round 5 continues a little bit past what the player can see in-game and uses otherwise unused ceiling and floor tiles.
- Pages missing developer references
- Games developed by Taito
- Pages missing publisher references
- Games published by Taito
- Arcade games
- Pages missing date references
- Games released in 1990
- Games released in August
- Games with unused areas
- Games with unused enemies
- Games with unused graphics
- Games with debugging functions
- Games with hidden level selects
Cleanup > Pages missing date references
Cleanup > Pages missing developer references
Cleanup > Pages missing publisher references
Games > Games by content > Games with debugging functions
Games > Games by content > Games with hidden level selects
Games > Games by content > Games with unused areas
Games > Games by content > Games with unused enemies
Games > Games by content > Games with unused graphics
Games > Games by developer
Games > Games by developer > Games developed by Square Enix > Games developed by Taito
Games > Games by platform > Arcade games
Games > Games by publisher
Games > Games by publisher > Games published by Square Enix > Games published by Taito
Games > Games by release date > Games released in 1990
Games > Games by release date > Games released in August


