User:Shadowboxer2005/Sonic Adventure AutoDemo/Stage Differences
This is a sub-page of User:Shadowboxer2005/Sonic Adventure AutoDemo.
Contents
Twinkle Park
Twinkle Park crashes while loading due to expecting a different 1ST_READ.BIN, although extracting the geometry shows some differences, and there are several oddities to note:
- There's a camera file for Act 1 called CAM0300.BIN, lacking the character suffix; it has a date of July 30th, making it one of the oldest files in the build, although there's little differences to the used version aside from different IDs.
- Although Act 1's geometry is near identical to the final (barring different textures at the start), the object layout matches up with the Tokyo International Forums unveiling build and has a date of September 9th.
- There's a unique rotating piece of geometry in Act 1 at the beginning that was discarded for the final.
- Act 3 has a large amount of camera data, all of which are below to the side of the stage; prerelease videos show Amy and Big in unknown rooms that look like Twinkle Park, so it's possible this was their original use.
- Act 2 is missing most of its objects and is impossible to complete, while Act 3 only has a single trapdoor.
- Only Sonic has an object layout for Act 3, although a SET0302S.BIN exists in the final, but unused as Sonic doesn't go to Act 3.
Speed Highway
Speed Highway is the level used for Sonic's demo, with it and Red Mountain being the only two levels Sonic can complete normally.
Tails' version is pretty much identical to Sonic's, but he isn't able to move at all. In what seems to be a test for the opponent's AI, he moves along a set path in mid-air that will eventually kill him near the platforming section by the Helicopter.
Act 1
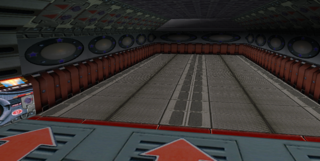
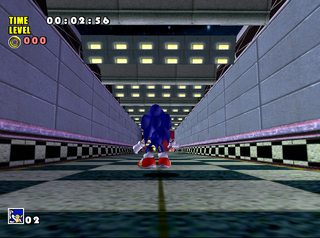
- The starting point is very different. The ceiling is lower, the walls use a different texture, and the camera is lower:
| Proto | Final |
|---|---|
 |
 |
- No black fog on faraway geometry.
- The lighting is slightly different, having a different direction and being darker in the AutoDemo.
- A Life box on the platform to the right of the start was changed into an Electric Shield box in the final.
- Three rings at the top of the two large buildings at the beginning are changed to life boxes in the final.
- In the middle of the buildings at the beginning are boxes containing a Life, ? Rings and another Life. In the final this was changed to 5 Rings, a Life and another 5 Rings.
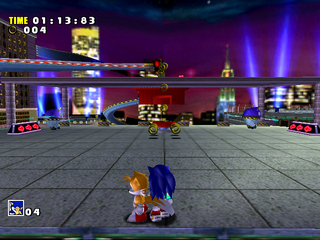
- The building before the first checkpoint is very different to the final version. It has Tikal hints, Rings and more decor present.
| Proto | Final |
|---|---|
 |
 |
- There are no rings to collect in the moving platform section.
- No invincibility or speed shoes boxes on the wall Sonic runs along.
- Speed shoes on the platforms at the back of the lower area are missing.
- To the right of the checkered area of the lower path, there is an empty building. In the final it has rings, a Cop Speeder and a life in the final.
- The small slope just before the building with the bell area on the lower path has six rings instead of eight.
- Sonic slower than normal going up the stairs at the bell.
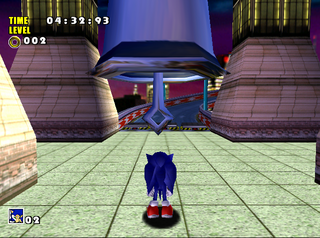
- The bell is a different color and lower than it is in the final. This is the same case for the bell in Act 3.
| Proto | Final |
|---|---|
 |
 |
- Two 10 Ring boxes below the bell area. In the final, one of these is changed to a shield.
- Rings were added after the dash panels after the bell in the final.
- Two lines of 2 rings were turned into one line of four rings in the final just before the tunnel.
- There are two rings at the end of the tunnel in the lower path not present in the final.
- Double line of rings before the square moving platforms was reduced from six to four in the final.
- There is no speed shoes box on the upper path to the square platforms.
- Camera on a life box under the first square platforms part is slightly different in the final
- There are arrow signs present next to the three springs that launch the player over to the helicopter.
- The Tikal hint near the helicopter does not have rings surrounding it.
- The helicopter has a different camera during its flight scene.
- Speed Shoes box in the area after the helicopter is missing.
- There are two lives after the upper path's homing attack chain above the end of the Act. In the final, this was reduced to one.
- A circle of rings was added to the bottom of the large circular building in the middle path.
- A line of four rings on the slope leaving the circular building in the middle path was changed to a square.
- A line of six rings at the dash pads after the moving platform was reduced to four.
- The large building on the lower path only has two squares of four rings, three Cop Speeders, and a 10 ring box surrounded by a semi-circle of rings. In the final, the building adds two more squares of rings, three 5 ring boxes, two Uniduses and changes the 10 ring box into a shield box surrounded by a square of rings.
- The second moving platform has no rings either.
- A line of four rings at the end of the middle path (where it meets with the lower path) is missing in the AutoDemo.
- Two lines of three rings on the road approaching the area with the rocket were changed to three straight lines of four rings.
- The Spinner and the bomb box are absent at the rocket area in the AutoDemo.
- A line of two rings next to the rocket were changed into a line of four rings in the final.
- One of the buildings in Tails' section of the map has a chunk of geometry missing.
The text for Tikal's messages in this level are as follows:
| Japanese | Translated |
|---|---|
| ジャンプ中にもう一度ジャンプボタン!? それで簡単に敵を倒せるはずよ。 | (Press the) Jump button once more while jumping! Then you should be able to defeat enemies easily. |
| 落ちないように気をつけてね! | Be careful so you don't fall! |
Act 2
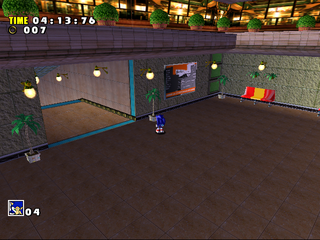
- The objects at the bottom of the level are arranged differently. There are no benches or posters, but there are more palm trees in the area at the bottom than the final. This is also where the level ends, with a capsule being present and the path to Act 3 is blocked off, despite its transition existing and being fully functional.
| Proto | Final |
|---|---|
 |
 |
- There are no objects or lights in the small starting area.
- The controls moving left and right while running down the building are slightly looser than the final.
- There are no item boxes.
- The circles of rings at the end of the act are missing.
- There are a more plants on the ledges above the bottom of the level than the final.
Act 3
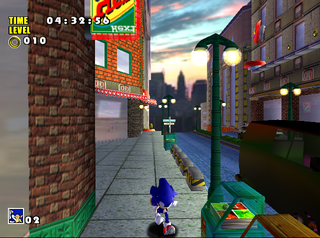
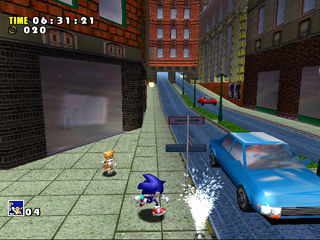
Along with Windy Valley, Act 3 of Speed Highway is one of the levels in the AutoDemo that has the most changes from the final game. This version of Speed Highway is very close to the one used in early images for the game, with the main differences being that the early images lack buildings in the background texture, instead having a unique fading effect that was discarded for the final:
| Early Screenshot | AutoDemo | Final |
|---|---|---|

|
|
|
The background image in this version is still a bit different from the one in the final game - the buildings are darker, along with some very minor tweaks to certain rooftops.
| Proto | Final |
|---|---|
 |
 |
- Act 1's lighting is used here, as the level's own file is missing.
- The level is textured very differently to the final. For example, many platforms use brick textures rather than what they use in the final.
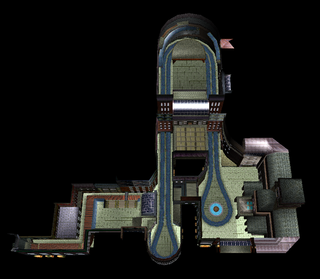
- There are major changes to the buildings in this part of the level. Notably around the center of the map:
| Proto | Final |
|---|---|
 |
 |
- The camera at the start of the level for Sonic is different.
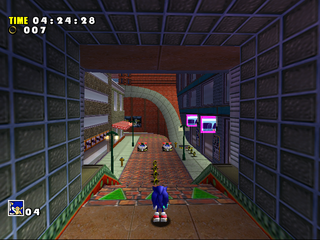
- The start of the level is noticeably different. There are rings on the small walls that aren't there in the final, the road is slightly wider, there is a continuous line of 10 rings at the dash panel near the start and a checkpoint that is not present in the final:
| Proto | Final |
|---|---|
 |
 |
- There are more decorations on the sidewalk, including plants and newspaper stands.
- There is an area with a speed shoes box to the right of the dash panel near the start that was replaced with a building in the final.
- There is a hole in the road with a clock tower, benches and rings inside near the start that is not present in the final. This is the same clock tower hole that can be seen in early images of the game:
| Early Screenshot | AutoDemo |
|---|---|
 |
 |
- The Spinners that are at the location of the clock tower hole in the final are missing.
- On the building to the left of the hole are awnings and a platform with a ring on it that aren't there in the final.
- There is a searchlight at the top of the building to the left of the start of the stage that is not in the final.
- The speed shoes box on the building to the left of the start is in a different spot, and neither has the rings surrounding it or the containers near it from the final.
- There is a jump panel on the speed shoes building that isn't there in the final. This jump panel sends the player quite far - 9 panels, which is longer than any of the panels used in the final game.
- Three Rings on a small ledge at the corner near the clock tower hole were changed to 4 rings that were more evenly spaced out across the ledge.
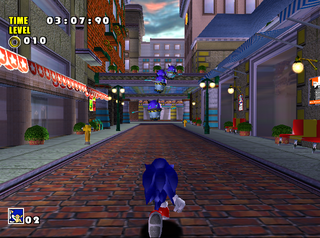
- The path leading the main street is wider than the final. There are also four Spinners before the glass roof that were reduced to only one in the final and there are many more plants at the area on top of the glass roof than there are in the final:
| Proto | Final |
|---|---|
 |
 |
- Due to the path being wider, there are 12 glass panels instead of 9 in the roof.
- The entrance to the small tunnel Sonic can run through lacks a shield box and the ledge is narrower and not directly connected to the tunnel.
- A set of 2 rings on the ledge to the right of the panels were changed to a set of 3 in the final.
- There is a line of rings missing on the wall Sonic runs across.
- The building that Sonic can run on top of has a steeper roof with two Spinners on it. In the final, the roof is made slightly lower and the enemies are replaced with containers, rings and a 5 Ring box. There are also arrow signs on top of the building that are replaced with four posters in the final and an overhead camera that is not present in the final.
- A line of three rings is missing from the area the player can access by jumping over to the right of the building's roof.
- In the small area the player can jump across to, the life box is in a different spot and the ledge is much larger than the final. There is also a spring here that the player can use the jump onto the building in front of them as a shortcut to the end. In the final, the this is replaced with a small passage with a wall between it and the life box.
- The clock at the loop in the road has a different base to the final.
- There are two Cop Speeders near the clock that are not in the final.
- The sidewalk is lined with rings, dash panels and springs both on the sidewalk and on small ledges attached to the sides of the buildings. In the final, only one line of springs remains and are accessed through a Spinner floating over the road (that of course does not exist in the AutoDemo) and sends the player into a small tunnel.
- The level goes downhill. In the final, it goes uphill instead:
| Proto | Final |
|---|---|
 |
 |
- The two buildings that the cars drive under are much shorter and able to be walked on top of in the AutoDemo.
- The path where Sonic runs along a wall after the first tunnel is different, featuring things such as glass panels.
- There is a second tunnel that is not present in the final.
- The last tunnel is in the form of a ramp and has arrow signs and a speed shoes box on top of it.
- There is a long, raised platform that is not in the final at all near the end of the stage. It has two lines of rings, a 10 Ring item box, a Unidus and the fountain that sends you to the end, with a support column in the place of the fountain's final location.
- The buildings in the center of the road area are very different to the final. They only have two containers on them and the building heights are much different to the final. The small tunnel with steps in from the final is also missing.
- The Cop Speeders near the end of the stage are in different locations to the final.
- The Spring to enter the small tunnel in the building near the fountain does not launch sonic high enough.
- There are four extra rings in the fountain.
- There are a ton of rings around the city hall building that were considerably reduced in the final.
- There are three springs to the left of city hall and one spring to the right of it. In the final, there is one spring on the left and two springs on the right.
- There are dash panels in front of city hall that lead to the spring to the right of the building. The life box there is also missing.
Knuckles' version of the stage uses an SET file from August 11th, meaning it's the same object layout shown in the Tokyo International Forums unveiling and none of the objects that appear in the level are correct. He can still find Master Emerald shards, but sometimes the third shard won't appear, making the level impossible to complete, likely due to the shard being inside non-existent enemies or objects. The trash can object that goes unused in the final can be seen correctly textured here, unlike how it appears in the final.
Sky Deck
Sky Deck crashes due to expecting a different 1ST_READ.BIN, but can be completed (as Sonic at least) due to having act transitions and a capsule. The lighting files are also present, and are identical to the final game's.
Act 1
- Act 1 is far more linear than the final, with the alternate routes around the first checkpoint being completely absent.
- The game will transition the player to Act 2 before the cannon is even destroyed; in fact, you can ignore the rocket altogether and just walk into the load zone.
Act 2
| Proto | Final |
|---|---|
 |
 |
The act has a few texture differences, but otherwise looks the same as the final.
- This act is overall pretty empty compared to the final, including the (very pointless) jump panel trail, and almost all objects at the beginning.
Act 3
| Proto | Final |
|---|---|
 |
 |
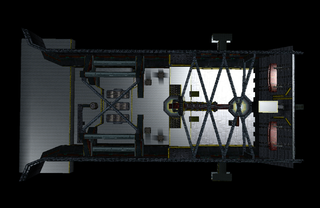
Again, slightly different design to the final.
- Like with Act 2, this stage is very empty, but does use OCARRIER3 unlike the final.
- There are no invisible walls near the capsule.
- Knuckles has a object file for this stage, which is identical to Tails' unused version.
Lost World
There are few changes to Lost World's geometry - one being that the demo lacks the background walls from many of the areas throughout the level. However, the level has many differences in its object layout to the final version. However, the only differences in Act 3 are that there is no capsule and the door behind the starting point is missing.
Act 1
- The starting room has an open ceiling that was covered up in the final.
- There are flaming arrow shooters near the start of the stage.
- There is an extra Boa-Boa at the start of the stage.
- There is a dash panel missing before the long tunnel of flaming blocks.
- There are no platforms after the long tunnel of flaming blocks.
- There is no item box over the spike pit.
- The checkpoint is missing.
- The camera messes up when the player enters the snake room.
- The snake room is completely different. The platforms are in different locations and the route to complete the puzzle is different.
Act 2
- The mirrors are missing in the dark room.
- There is a Boa-Boa in the dark room that is replaced with a Sol in the final, however the Boa-Boa still exists in Knuckles' version of the stage due to it being based on an earlier revision of Sonic's version.
- There are no arrows at the end of the dark room.
- There are no rings in the water slide.
- The layout of the light puzzle is different. There are Boa-Boas here and all the switches are situated on high platforms in different spots to the final.
- The wall panels in the light room are already connected to each other, rather than being separated initially.
- The switches for the wall panels in the light room have bright lights over them. This was removed in the final.
Adventure Fields
Only the Adventure Fields that are used for cutscenes have their proper textures, and attempting to enter any will eject the player to the title screen.
Mystic Ruins
Crashes while loading due to expecting a different version of 1ST_READ.BIN; extracting the geometry shows some differences, although it's mostly identical to the final.
- The monkey cave in the train area is a slightly different shape to the final.
- The light speed attack ledge on Angel Island is missing
- The bridge on Angel Island is also slightly different to the one in the final version.
- The jungle area (which is notorious for crashing level viewers) has more paths, modelled trees, and a differently shaped Sand Hill area.
- SonicAdventureAutodemo MysticRuins3.png
The jungle area with the leaves removed for better visibility.
Bosses
All of the stage bosses excluding E-101 can be found in this build, but only Chaos 2 can be loaded due to most of them being compiled in September and expecting a different version of 1ST_READ.BIN.
Chaos 0
Chaos 0 still uses the same object layout shown in the Tokyo International Forums unveiling, and as a result there is more decoration, rings, and the clock is placed higher.
Egg Hornet
Egg Hornet's arena uses a very early model of the Mystic Ruins. None of the details present in the final game can be seen here and completely lacks references to textures, much like the maps used for Casinopolis.
Chaos 2
This is the only boss map in the prototype that doesn't crash the game when loading. While the arena itself doesn't have any interesting differences other than lacking textures, an early version of the boss can be found and interacted with. Chaos 2 stands in the center of the arena initially in an inactive and invulnerable state (and will lag the game a lot on real hardware), but despite this can still hurt the player via collision damage. If playing as a character other than Knuckles, they'll die immediately after spawning due to starting at the same position as the boss.
There are two ways to activate Chaos 2; the first method to activate Chaos is to press X and then A or B. This will cause him to approach the player, but he won't perform any attacks. While Chaos is active the camera will be locked. The player can damage him just like in the final game, and he responds in the same way (becoming a giant ball and bouncing around the room). Damaging Chaos repeatedly will eventually defeat him and clear the stage. To make Chaos 2 stop moving again, press X. The second method is to set the byte at 0x8C6A4EAA (0x2C in Demul). This will start the boss cutscene where Chaos' name is shown on the screen (well, if the textures existed). In this mode, the camera will not get locked and Chaos can use all of its attacks. Notably this version of the boss lacks the delay after its punch attack that its final version counterpart has, something that can also be seen in early trailers.
Notably, both Sonic and Knuckles have blank camera files, which is interesting since Chaos 2 is a Knuckles-exclusive fight in the final. Additionally, these files are unneeded since the game is programmed to lock the camera on the boss at all times.
Perfect Chaos
The arena for Perfect Chaos is completely different to its counterpart in the final game.
The buildings around the perimeter of the arena are much taller than the final version's. Furthermore, there is only one stretch of buildings, rather than the final version's loop shape. This suggests that the player would keep using the same part of the stage for the entire fight rather than moving through different areas. The textures for this stage are available (LM_CHAOS7.PRS, lacking the trailing _0), but they were made using an earlier version of the texture list, resulting in them not matching very well.
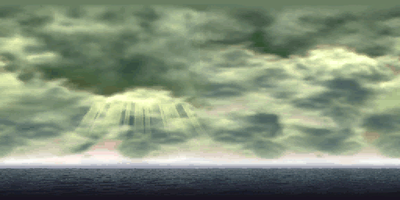
The background has some minor differences such as the sky's position and the ocean's color, but the final version is overall higher quality:
| Proto | Final |
|---|---|
 |
 |
