Wario Land 4
| Wario Land 4 |
|---|
|
Also known as: Wario Land Advance: Youki no Otakara (JP)
|
Wario decides to hit up the local ancient pyramid for some treasure. Little does he know, the pyramid is anything but ordinary.
Contents
- 1 Sub-Pages
- 2 Debug Mode
- 3 Unused Graphics
- 3.1 Early Logo
- 3.2 Title Screen Text
- 3.3 Hidden Newspaper Header
- 3.4 Big Heart
- 3.5 Rocks
- 3.6 Goggley-Blade
- 3.7 Ringosukī
- 3.8 Debug Room Graphics
- 3.9 Flip Smiley Block
- 3.10 Hall of Hieroglyphs
- 3.11 Palm Tree Paradise
- 3.12 Wildflower Fields
- 3.13 Mystic Lake
- 3.14 Moonsoon Jungle
- 3.15 The Curious Factory
- 3.16 The Toxic Landfill
- 3.17 40 Below Fridge
- 3.18 Pinball Zone
- 3.19 Crescent Moon Village
- 3.20 Arabian Night
- 3.21 Hotel Horror
- 3.22 Golden Passage
- 3.23 Pause Text
- 3.24 Fonts
- 3.25 Mini Map
- 3.26 Empty Painting
- 3.27 Game Corner
- 3.28 Golden Passage Bricks
- 3.29 Game Corner Door
- 3.30 Item Shopkeeper
- 3.31 Level Intro Pillars
- 3.32 Misc Level Intro Tiles
- 3.33 Boss Hall Tileset
- 3.34 Boss Doors
- 3.35 Smaller Tack Capsule
- 3.36 Key Animation
- 3.37 Bored Animation
- 3.38 Golden Diva's 13th Mask
- 3.39 Language Option
- 3.40 Dead/KOed Sea Gull Graphics
- 3.41 Intense Mode
- 3.42 Vortex Marking
- 4 Unused Rooms
- 5 Unused Music
- 6 Oddities
- 7 Version Differences
Sub-Pages
| Development Info |
| Debug Build A debug build of the game, made from partial source code contained in the July 2020 lotcheck leak. |
Debug Mode
To do:
|
Wario Land 4 has a simple debug mode built into the game. Setting 0x03000C3C to 08 in the RAM will enable these modes. However, depending on where you are (the passage select screen, a level, etc.), this will yield different results.
Setting the value to 08 while in any level will allow you to do the following:
- The D-Pad moves Wario freely around the map.
- Press Select to resume playing the level normally.
- Press Start to cycle between two camera modes: normal level scrolling, and scrolling to see an entire map, including what is cut off. Pressing Select to resume play will reset the camera to normal level scrolling.
- Hold R while moving to move faster in free movement mode.
- While in debug mode, timers activated by Frog Switches will not begin counting until free movement mode is disabled, and will pause when free movement is once again enabled.
- L + Up while in free movement mode will auto-complete the level with a Keyzer to unlock the next door, all four gem portions, and the level's respective Sound Room record. Using this on a boss level will defeat the boss, but will end like a normal level: you leave with a Keyzer, three gem portions, no record, and the Keyzer unlocks the next door (Surprise! There's another door behind that door!). As well, the painting on the wall has a huge "X" on it.
Codebreaker code 74000130 01FF 33000C3C 0008 will also enable these functions by pressing L to activate the free-movement mode. The code must then be disabled in order for the level auto-complete function to work correctly.
After Wario strikes his surprised pose, it will send you to a location on that level select area that will go to a level that is not in that passage's set of levels. Selecting this level then brings you to a black screen, where Wario jumps into seemingly nothing, but the level that is displayed works as it should. If you use this on a level you've previously cleared, the Keyzer will come with you and re-unlock the door, acting as if you've just beaten the level for the first time.
Unused Graphics
To do:
|
Early Logo
An early version of the game's logo. This would have fit with the Japanese title, Wario Land Advance. Curiously, it is not loaded in the Chinese version.
Title Screen Text
Interestingly enough, there are sprites for Save Game related text using the same style of the Press Start prompt. Maybe the game origially used a single game save, akin to Wario Land II and Wario Land 3?
Hidden Newspaper Header
| In-game | Full graphic | |
|---|---|---|
| JP/US/EU | 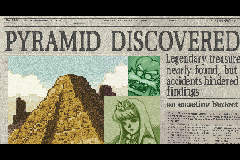
|
|
| China | 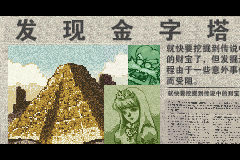
|
|
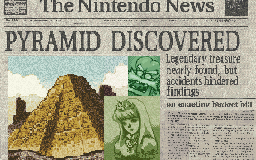
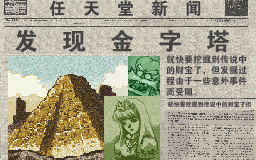
Because of the letterboxing in the opening animation, the very top of the newspaper is obscured. The full graphic reveals that the name of the newspaper is "The Nintendo News".
The advertisement in the ending also has the top cut off, but it's just more scratchy text blocks similar to the one at the bottom of the ad.
Big Heart
This refills all of the heart meter, an effect normally reserved to Heart Boxes, which are sprites and not foreground blocks.
Even though this block exists for almost every level, none are placed in-game.
Rocks
Sprites for the rocks Wario can throw around, incuding two alternate designs and its debris, possibly hinting rocks were going to act like their Wario Land 3 incarnation in that they would've been able to break.
Goggley-Blade
Unused turning frames for the Goggley-Blade, showing it could have changed direction more freely rather than always turning left.
Ringosukī
While this sprite isn't unused, the game overlays shades on top of the eyes for consistency with the other graphics. As a result, its eyes are never seen.
Note this is the only frame where this happens. In all others, the shades are drawn on the actual tiles.
Debug Room Graphics
A surprising amount of graphics or blocks are loaded but never used in the debug room. Some aren't even loaded but are still related.
Coin
Graphics of a coin, stored next to the blue and red jewels. Unlike the in-game coins, these are foreground blocks and not sprites.
Note how a tile is missing in the first frame. In the debug room, said missing frame is used to mark blocks that give out coins.
A fixed version of the first frame exists alongside both other debug room graphics and an early tileset:
This is how the animated coin tile would have appeared in-game:
Red Arrow
A block that sets Wario on fire. It could have been used to break Red Stone Blocks in the Debug Room... if they were placed.
This other block however is completely solid.
Generic Blocks
Empty blocks. The first one uses the warp tile graphics, while the second one is unique.
A different generic solid block with a purple outline. There's nothing else to say here.
Heart
While hearts aren't placed in the debug room, a block for them does exist and uses obvious temporary graphics.
Horizontal Pipe
Horizontal pipes ala Wario Land 3 go completely unused in this game. While the respective graphics and blocks only exist in the debug room, they don't do anything.
Early Debug Tiles
Earlier versions of debug tiles, which are almost completely transparent and have a simple black outline.
Snowman Block
Snowman Blocks modeled after their appearance in Wario Land 3. All the snowman blocks used in-game have an original design.
Unknown Debug Room Tiles
Unknown tiles for a strange line. For what it's worth, it's never used in the debug room.
Early Tileset Blocks
| Earlier | Early |
|---|---|
Two different early tilesets. The earlier one is used as padding for the background tiles in several tilesets, while the later one is loaded in the boss rooms.
- Both tilesets use placeholder tiles consisting of blocks with hexadecimal numbers.
- Placeholder Smiley Blocks.
- The correct palette for the blocks doesn't seem to exist anymore. What's used here is a custom palette.
The earlier tileset features coins, outlines, and a different version of the warp block. The other one replaces them with the jewels used everywhere else in the game, as well as adding an unique sand(?) block. This tileset also contains one less block.
Flip Smiley Block
A different smiley block which could apparently be flipped to become angry. The palette for this doesn't exist either.
Hall of Hieroglyphs
The only secret breakable block in the level has the outline on the right. This variation exists nonetheless.
An early and glitched version of the light blocks. These are stored right before the used ones.
Palm Tree Paradise
This is the set of debug blocks present in this tileset. Most levels only include the solid block.
Note that some can still be seen by removing Layer 1.
An unknown unused block. It doesn't seem to use the proper palette, but this is how it would appear in-game.
Wildflower Fields
A slope for the bottom of the level with flowers has a slope variant defined, but is never used, likely due to how they were only able to be used in this context.
The stem of a giant sunflower has a few tiles where they are covered in brambles, likely intended to harm the player on all sides, but is not used anywhere in the level.
Mystic Lake
This part of the background is always hidden behind foreground water, which is probably a good thing - this tile doesn't mesh well with the rest of the background.
Moonsoon Jungle
Compared to other tilesets, this one uses much more tiles from the debug room, including some unique to this level.
Top-right and top-left curved angles are used in various parts of the level. This isn't the case for these two.
The caves of Monsoon Jungle have an unused brown palette, shown here. This is not seen anywhere in the game; in the final game, the cave is colored green and is slightly darker.
The Curious Factory
Unused block formations that Wario can pass through. This may not be the way it's supposed to appear in-game, but it's stored like this in the tileset.
The Toxic Landfill
Among the pile of garbage in the first tileset, there is a graphic of a cell phone which is never seen in-game. Based on the phone's design, it seems like it was meant to be a jab at Nokia phones, and the urban legends about how they were "unbreakable".
40 Below Fridge
The non-frozen sections of 40 Below Fridge has a fair few unused tiles in the game, with their proper palettes to boot. Given how they had limited space to work with, and that there were only two rooms that used this tileset, it seems plausible that most of them just couldn't be used.
Pinball Zone
Pinball Zone has an unused orange solid block and a semi-solid platform that seems like it would be able to be stretched to any horizontal length defined in the graphics files in the main room's tileset. In the final game however, the solid blocks are all gray, while all semi-solid platforms only use their one-block variants, stretched to varied sizes.
Crescent Moon Village
The interior tileset for Crescent Moon Village has unused tiles for windows and doors. These aren't in the same style as the rest of the tileset, so it's likely the graphics for this stage changed significantly in development and these were cut as a result.
In the sewer tileset of Crescent Moon Village, there's an unused grate tile like the ones in the background. However, this version seems to be placed on top of some bricks, hinting that the grates were meant to be foreground decorations at one point in time.
Arabian Night
In the outdoor tileset, there is a graphic of a barrel which looks solid enough to be stood on, but is not used anywhere in the level.
Additionally, there appears to be a very weird-looking rock, which looks like it was intended to be broken with a tackle. It has its own palette, but again, it is not seen anywhere.
Hotel Horror
Hotel Horror has a plethora of unused graphics, most of which were used to decorate the walls of each room, outside of Room 102. It is unknown why they went unused in the final game, but it was likely due to time constraints.
The interior room tileset for Hotel Horror has an unused skull tile that seems like it was meant to be placed in the walls. This is very similar to a tile used in Palm Tree Paradise, and hints that it was meant as a 'hint' that a wall was actually fake and hiding a secret room (like in said level).
There are four wallpaper variants in the level, but only the diamond pattern wallpaper has its torn-up and worn-out variants to decorate the rooms used. Every other variant has these ripped variants defined, but are not seen in the final game.
Additionally, Rooms 303-403 have a lot of wall variants that went unused, intended to decorate the walls and make the place look more worn-out.
Finally, the fire escape tileset has a few unused tiles, one of which is a big solid metal platform and the other what looks to be a solid wall.
Golden Passage
The hallway of the level has a variant of the golden wall decorated with curtains and windows that is not affected by the lighting of the pillars. Surprisingly, this variant is not found, likely due to how there are pillars found all throughout that part of the level.
In the same tileset, we have some very weird-looking blocks with an arrow pointing down.
Pause Text
A Pause sprite in the same style of Quit, Resume, and Give Up.
Fonts
Rather than using this unique font in the map screen, the total coin counter uses consistent graphics through the game.
Hexadecimal font which is never loaded in-game.
Mini Map
| BG Tiles | Object Tiles 1 | Object Tiles 2 |
|---|---|---|
Unused graphics for a stylized mini map screen. The final game doesn't have anything remotely resembling this.
The palette for these tiles doesn't exist.
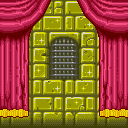
Empty Painting
A completely blank painting, stored multiple times as a placeholder for nonexistent levels in Entry Passage and Golden Passage.
Game Corner
| BG Tiles | Sprite (Black) | Sprite (Light) |
|---|---|---|
An early name for the mini-game shop is loaded within the level intro screen. It seems this was supposed to be animated, as there are sprites for black and lighter letters which would have overlayed the tiles.
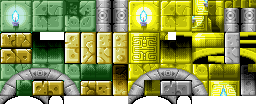
Golden Passage Bricks
Unused variations of the bricks in the level intro screen. The bricks used in-game don't have anything written on them.
Game Corner Door
This is similar to the Item Shop door, except it's loaded in the level intro screen and has a different icon design.
Item Shopkeeper
The Item Shopkeeper has an unused sprite on a skateboard.
Level Intro Pillars
While technically used, the middle of these pillars is always out of view.
Misc Level Intro Tiles
Miscellaneous tiles loaded in the level intro. They seem to be two different sets of four floor blocks.
Boss Hall Tileset
A duplicate of the boss room tileset minus animations are loaded in each pre-boss hall, except stored in 8bpp format. Even if these were used, they would not appear correctly as the game would show them as 4bpp tiles.
Palettes exist for every boss room, including the last one (which has slightly different graphics compared to the rest).
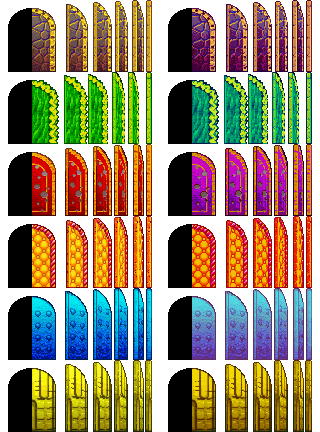
Boss Doors
Each boss door not only has an unused opening animation, but an unused alternate palette to go with it. In-game, the doors all slide up instead of opening, only making use of the first frame.
An example of what the animation might have looked like.
Smaller Tack Capsule
The tiles for the Aerodent boss battle include two sizes for the capsules that open into the tack enemies. The graphic above is used for when Aerodent first throws them. Since Aerodent only throws them when it is well past the top of the screen, only the larger version is ever seen. This capsule can be seen in-game if debug mode is enabled.
Key Animation
Wario pulling out a key and opening a chest, much like the animation from Wario Land 3. In this game, Wario merely touches chests to open them and none are actually locked. The key is never seen anywhere else.
Bored Animation
Wario crossing his arms, tapping his foot, and then falling asleep. It might have been an alternate waiting pose to go with his other idle animations. The animation can be seen by using the following Codebreaker codes and pressing the Select and R buttons while in any level:
74000130 02FB
33001899 0045
74000130 02FB
830018B6 0000
Golden Diva's 13th Mask
This mask, featuring the Golden Diva's first head with a large number 13 on it. Indeed, it is the 13th of the Diva's masks in the data (excluding the stunned face). It's probably just a placeholder.
Language Option
The game has graphics for an English/Japanese language select, similar to Wario Land 3, though "Japanese" is misspelled "Japanease". While both versions of the game contain both languages, this setting can only be changed in the debug build.
Alternatively, the language value in RAM can be switched with a cheat device. Using CodeBreaker format:
| Japanese to English | English to Japanese |
|---|---|
| 33000016 0000 | 33000016 0001 |
Dead/KOed Sea Gull Graphics
The sea gull in the Wario Hop mini game has graphics for being knocked out or killed, meaning Wario was likely going to be able to interact with it at some point. These sprites go unused in the game itself.
Intense Mode
In the screen saying you've unlocked Super Hard mode, there are graphics for "Intense Mode" in memory. It's probably either an unused name for Super Hard mode or a removed extra difficulty option.
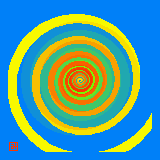
Vortex Marking
The background for when the scene that shows Wario falling through the vortex before each stage has a little boxed-in hiragana "mi" (み) in the corner, possibly a signature. Because of how the background is used, it never appears on-screen. It changes colors with the rest of the background.
Unused Rooms
Lost Room
A small cave room was removed from the end of Palm Tree Paradise, which would have been accessed by bashing the wall behind the Frog Switch. The exit is fully functional, but the wall is completely solid and the background piece that would have gone in the revealed entrance was moved up out of the way. However, the exit still works in both directions.
The room itself has sprite layouts for each difficulty, with the number of enemies increasing to 5 on Super Hard and the diamond being removed. There is also an effect that darkens the background layers the closer Wario is to the entrance, which makes sense but isn't very intuitive. A similar effect is also used in the debug level. A video showing off the room can be found here.
Debug Level
The debug level can be accessed with GameShark code 33000003 0002 and choosing the Entry Passage. Interestingly, Metroid Fusion uses Wario Land 4 blocks and crystals in its debug rooms, which is a not-so-subtle hint that it was built on the same engine.
The stage itself is made of black blocks on a black background, making it difficult to see without changing the background color. The regular block from this tileset is actually used in multiple levels to make the solid borders of the map, and the dotted block is used for exits. The music used is the same as the last level you visited.
The first room has various types of terrain for basic engine testing, with platforms, ladders, slopes, climbable walls, water, spikes, and blocks. The first unusual feature in the room is a pair of pipes and yellow gems. The gems are switch-activated red gems with the wrong tiles, and the pipes lead to each other. Past this, the block of grey X tiles lead straight to the level select screen, a feature only used in boss levels. The yellow gems are the basic 10-coin blue gems with a different palette. The two blocks with a yellow tile in the corner were used to test blocks giving out coins. The third door in the room passes in front of Wario instead of behind him. The dotted blocks warp to each other.
The room through the first door is a layer-3 water testing room. The water actually fades to different levels of opacity based on Wario's height, being invisible until you actually fall into it the first time. This feature is unused in any of the final levels. The water opacities shown in the map indicate the depth at which the change is triggered. The water opacity remains at the same level until Wario reaches the previous trigger height, meaning the water will always stay visible. The arrow tiles indicate current, with yellow arrows indicating the strong current used in the game, and blue arrows indicating a weak current that merely pushes Wario at the same speed at which he can swim, another unused feature. The two doors in the water lead to each other. Yes, there is a monkey walking around at the bottom.
The third room features the limited vertical camera scrolling as seen in several levels, along with a lot of spikes. The purple spikes are solid to Wario even when he is flashing from damage, but enemies can pass through it. This is another unused feature. The non-animated yellow gems are actually blocks that become ramps when the switch is hit. The graphics stay the same, but the physics of it change.
The final room has nothing more than a bunch of platforms, gems, and some blocks. The door at the top leads to the door at the bottom.
Unused Music
Golden Passage
The final level, Golden Passage, starts you off immediately pressing the Frog Switch, therefore having the whole level use the runaway theme. However, if you hack the game to prevent Wario from pressing the switch, there is an actual Golden Passage theme! (You can also pause just before landing on the switch, but the volume will be lowered.) Alternately, enter the level, pause and exit the level just before you land on the switch, and enter the debug room.
Since this theme is exclusive to Golden Passage, it is likely that at some point the switch was not below the entrance.
Unknown
An intro-less variation of the main map theme.
Oddities
Layer 1 Overlays
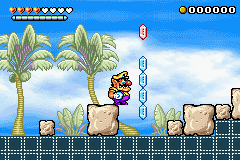
Most of the rooms in the game use solid blocks in Layer 2 with graphics from the respective level to define solid ground, while Layer 1 is left mostly blank. Few rooms however, use debug tiles on Layer 2 to define solid ground and overlay the proper level graphics using non-solid tiles on Layer 1. The Debug tiles are normally unseen.
| With Layer 1 | Without Layer 1 |
|---|---|
 |
 |
Level Intro Tilemap
The level intro screen, where Wario presses the Frog Switch to activate the vortex, has two copies of room loaded side-by-side, as well as all of the tiles and palettes needed to draw all of the paintings in the current passage. This contrasts with how the passage map screen loads each painting individually as Wario moves through the map, and seems to indicate that the player was originally meant to walk through these rooms to reach the stages rather than using the map.
Version Differences
Credits Song
| Japan | International |
|---|---|
The first song in the credits medley was changed between the Japanese and International releases. Aside from the lyrics being changed from Japanese to English, the instruments and feel of the song were also changed, but the main melody was kept the same. As a result of the change, the international version is half a second shorter. Meanwhile, all versions keep the title song in English and the Palm Tree Paradise song in Japanese.
All versions of Wario Land 4 have both songs. It's possible to hear them by changing the language option.
The Wario series
| |
|---|---|
| Wario Land | |
| Game Boy (Color) | Wario Land: Super Mario Land 3 • Wario Land II • Wario Land 3 |
| Game Boy Advance | Wario Land 4 |
| Wii | Wario Land: Shake It! |
| WarioWare | |
| Game Boy Advance | WarioWare, Inc.: Mega Microgame$! (Demo) • WarioWare: Twisted! |
| GameCube | WarioWare, Inc.: Mega Party Game$! |
| Nintendo DS | WarioWare: Touched! (Demo) • WarioWare: D.I.Y. |
| Nintendo DSi | Paper Plane (iQue Prototypes) • Pyoro |
| Wii | WarioWare: Smooth Moves • WarioWare: D.I.Y. Showcase |
| Wii U | Game & Wario |
| Nintendo 3DS | WarioWare Gold |
| Nintendo Switch | WarioWare: Get It Together! • WarioWare: Move It! |
| Other | |
| NES | Wario's Woods |
| SNES | Mario & Wario • Wario's Woods |
| Game Boy (Color) | Wario Blast: Featuring Bomberman! |
| GameCube | Wario World |
| Nintendo DS | Wario: Master of Disguise |
- Pages missing developer references
- Games developed by Nintendo R&D1
- Pages missing publisher references
- Games published by Nintendo
- Game Boy Advance games
- Pages missing date references
- Games released in 2001
- Games released in August
- Games released on August 21
- Games released in November
- Games released on November 19
- Games released on November 16
- Games released on November 9
- Games with unused areas
- Games with unused graphics
- Games with unused music
- Games with debugging functions
- Games with regional differences
- Pages with a Data Crystal link
- To do
- Wario series
Cleanup > Pages missing date references
Cleanup > Pages missing developer references
Cleanup > Pages missing publisher references
Cleanup > To do
Games > Games by content > Games with debugging functions
Games > Games by content > Games with regional differences
Games > Games by content > Games with unused areas
Games > Games by content > Games with unused graphics
Games > Games by content > Games with unused music
Games > Games by content > Pages with a Data Crystal link
Games > Games by developer > Games developed by Nintendo > Games developed by Nintendo R&D1
Games > Games by platform > Game Boy Advance games
Games > Games by publisher > Games published by Nintendo
Games > Games by release date > Games released in 2001
Games > Games by release date > Games released in August
Games > Games by release date > Games released in August > Games released on August 21
Games > Games by release date > Games released in November
Games > Games by release date > Games released in November > Games released on November 16
Games > Games by release date > Games released in November > Games released on November 19
Games > Games by release date > Games released in November > Games released on November 9
Games > Games by series > Wario series


