Castlevania III: Dracula's Curse/Regional Differences
This is a sub-page of Castlevania III: Dracula's Curse.
Contents
Title
| Japan | US | Europe |
|---|---|---|

|
|
|
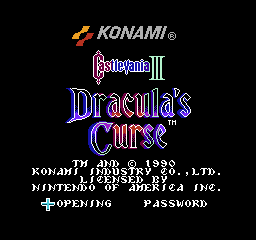
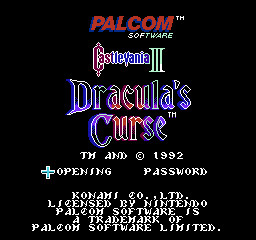
The Japanese title screen is rather barebones compared to the US and European versions, which add the usual copyright and licensing info and arrange the OPENING and PASSWORD options horizontally to fit. For some reason, the European release awkwardly places these in the middle of the copyright info.
The European release also replaces all mentions of Konami and their logo with "Palcom Software", which was a Konami subsidiary that handled PAL conversions at the time. It suffers from some minor palette issues on the "TWARE", the "III", and the "r" in "Dracula's."
Music
Akumajou Densetsu was the debut game for Konami's VRC6 memory mapper, as well as the VRC6's marquee title (since only two other games ever used it; both of them relatively obscure). In addition to bank switching (a standard feature for any mapper), the VRC6 supports three additional sound channels for in-game BGM: two square wave channels with extended duty-cycle support (compared to the NES/Famicom's APU), and one sawtooth channel. Combined with the Famicom's built-in 5-channel sound, this allowed Akumajou Densetsu to have a rich 8-channel BGM soundtrack, a technical feat matched by only a few other Famicom games.
When Akumajou Densetsu was localized into Castlevania III, it was ported to Nintendo's top-of-the-line MMC5 mapper. At the time, Nintendo did not allow third party developers to manufacture their own cartridges outside Japan, disqualifying the VRC6, since it was developed by Konami in-house. The MMC5 does in fact support three extra sound channels of its own, but sadly, these are of no use in an NES game, as only the Famicom allowed audio pass-through from a cartridge. (The MMC5 was probably chosen because it is the only Nintendo-designed mapper which supports the same bank switching modes as the VRC6, a trait which would have greatly simplified the porting process.)
When the soundtrack was adapted for the standard NES APU, Konami made some tweaks to the BGM by replacing drum samples, changing the compositions through adjusting the tempo, or adding/removing extra melodies.
| Song | JP | US/EU |
|---|---|---|
| Prelude | ||
| Epitaph | ||
| Prayer | ||
| Beginning | ||
| Boss Fight | ||
| Blk Clear | ||
| Destiny | ||
| Mad Forest | ||
| Rising | ||
| Aquarius | ||
| Riddle | ||
| Pressure | ||
| Big Battle | ||
| Big Battle 2 | ||
| All Clear | ||
| Flash Back |
- Prelude: For the final section of the song, the NES version swings the triangle bass down, while the original FC version just has the sawtooth bass go to a lower note directly.
- Epitaph: The song is played exactly one octave lower in the NES version, but the ascending gliding notes at the end are played at a higher key compared to the FC version.
- Prayer: The ending notes in the NES version are played more slowly and are sustained longer instead of being played as a quick riff like in the FC version.
- Beginning: Different bass drum samples are used in the NES version, along with arguably worse and weaker tom and snare samples; the toms also play solo with no cymbals during the NES intro. Additionally, the NES ending section does a descending sequence before the song loops again, rather than ascending like in the FC version.
- Boss Fight: The NES version plays in a lower key compared to the FC version.
- Destiny: There's a stark difference with the NES version - it features no percussion whatsoever compared to the original. All bass drum samples and noise drums have been completely removed.
- Mad Forest: The section leading into the main portion of the song is somewhat off-key in the NES version compared to the original FC version.
- Rising: Interestingly enough, the NES version adds an arpeggio effect in place of the chords that play on the 2nd part in the FC version.
- Aquarius: Although the notes played by the backing melody in the first onboard pulse channel for the NES version (moved from the second pulse channel in the FC version) are the same, the duty cycle has been altered to make it stand out more due to the removed extra channels.
- Riddle: The most significant difference with the NES version is that it is shorter than the original FC version. More specifically, the second section in the NES version plays only one time before leading into third and final section. In other words, if the original FC version's structure was A-B-B-C, then the NES version is A-B-C.
- Pressure: The NES version plays at a noticeably faster tempo than the original FC version.
- Big Battle (Parts 1 & 2): The original FC version has both songs, after playing the intro section, going into a higher key for the next section. The NES version instead just has both songs play the next section in the same key as the intro.
- All Clear: The original FC version plays chords on both the onboard pulse channels as the countermelody to the main melody that plays on the VRC6. The NES version, in addition to moving the main melody to the first pulse channel, plays a different countermelody which uses arpeggios that roughly follow the chord patterns of the original FC version.
- Flashback: The highest note that plays at the end of the third section of the song on the FC version is not hit at all in the NES version. Additionally, different notes play on the backing melody at the end of the NES version.
Intro
| Akumajou Densetsu | Castlevania III |
|---|---|
 |
 |
During the intro scroll, dark clouds sweep in above Dracula's castle in the Japanese version. Castlevania III lacks this animation.
English font
Castlevania III uses a completely different English font compared to Akumajou Densetsu, which employs a more typical "stock" NES character set. This change affects the appearance of all English text within the game, including the status bar and the end credits. (The opposite change went on to happen between the Japanese and overseas versions of Super Castlevania IV.)
| Akumajou Densetsu | Castlevania III |
|---|---|
 |
 |
Playable Characters
Grant
Grant's normal attack was modified for the US and European releases. In the Japanese version, Grant's normal attack acts like the dagger subweapon: Grant throws a large dagger across the screen. However, since it's his regular attack, it doesn't consume hearts and can also be used when crouching and clinging to walls and ceilings. Like the non-upgraded subweapon, only one of these daggers can be on-screen at a time. His only available subweapon is the axe which can only be upgraded once with a double-shot.
| Akumajou Densetsu | Castlevania III |
|---|---|
 |
 |
In the US and European versions, Grant's normal attack is a stab with a small, hand-held dagger which he cannot use from walls or ceilings. Instead, the dagger subweapon has been made available to him, and both the axe and dagger subweapons can be used from walls and ceilings. The subweapons can also be upgraded with the double and triple-shot.
Alucard
In the US and European versions, Alucard consumes hearts much more quickly while flying.
Second Quest
In the international versions, some enemies are replaced by improved variants with new graphics after beating the game once.
| First Quest | Second Quest |
|---|---|
Medusa heads become flying skulls with a very erratic and unpredictable flight pattern.
| First Quest | Second Quest |
|---|---|
 |
 |
The zombies in Stage 8 get some stylin' robes like they had in the original Castlevania. These zombies have more health, taking three hits to kill with a non-upgraded whip and two with an upgraded whip, rather than only one hit with both, and yield no points when killed. The emerging from ground sprites went unused, as all zombies in Stage 8 appear from the side of the screen.
| First Quest | Second Quest |
|---|---|
 |
 |
In most rooms, the knights gain a shield and learn to attack by thrusting their spears. These knights have more health, taking four hits to kill with a non-upgraded whip and three with an upgraded whip, rather than three and two hits respectively. They also yield no points when killed, and can still thrust their spears when frozen by the Stopwatch, possibly as an oversight. Like Axe Knights, the Cross flies back if it hits their shield rather than going through them.
Censorship
Castlevania III managed to slip a lot of religious imagery under Nintendo's radar, but all of the game's nudity has been censored. Some graphics and palettes have also been improved.
| Akumajou Densetsu | Castlevania III |
|---|---|
 |
 |
The nude statues seen on the name entry screen and password screen have been given dresses and their shading has been updated. The vines that were originally on the statues were removed.
| Akumajou Densetsu | Castlevania III |
|---|---|
 |
 |
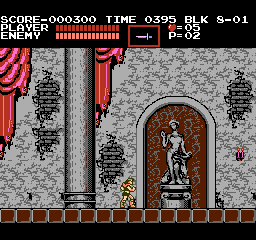
The same also applies to the nude statues at Block 8-1 in Dracula's Curse.
| Akumajou Densetsu | Castlevania III |
|---|---|
 |
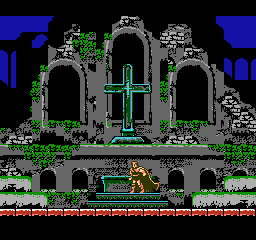 |
The cross in the intro scene originally had a "glowing" effect surrounding it, which was removed in Castlevania III.
| Akumajou Densetsu | Castlevania III |
|---|---|
 |
 |
Medusa lost her female characteristics in Dracula's Curse. Interestingly, Medusa kept her female characteristics in all versions of Super Castlevania IV.
| Akumajou Densetsu | Castlevania III |
|---|---|
Besides the breast reduction, the completely messed up animation frame for her aiming upward stance was cleaned up. Still, three of her animation frames were less than perfect. Her head looks suspiciously mispositioned in one of her aiming straight ahead frames.
A few Medusa-tiles went unused in the Japanese ROM, an arm meant for the glitchy animation frame. And a different part of the body found in both ROMs, meant for this frame:
| In-Game | Mock-up |
|---|---|
 |
 |
| Akumajou Densetsu | Castlevania III |
|---|---|

|

|

|

|
The leftmost statue where Sypha is met and the similar one where the Bone Dragon King is fought received additional clothing. Interestingly, a statue depicting the same woman does appear in headless form on the first stage of the game, but that one was left unaltered in the international releases.
Other Graphic Differences
| To do: Rip the sprites for the Double Dragon. |
| Akumajou Densetsu | Castlevania III |
|---|---|
In the Japanese version, the thrown Holy Water sprite lack the black outline it has in the original Castlevania. This was fixed in the international versions, but it somehow ended up with a reverse color palette.
| Akumajou Densetsu | Castlevania III |
|---|---|
 |
 |
The zombies were almost entirely overhauled for Castlevania III. The emerging from ground sprite was completely redone, and the walking cycle was altered.
| Akumajou Densetsu | Castlevania III |
|---|---|
 |
 |
The toads get more spikes and look angrier in the international versions. In what appears to be a palette-glitch in the Japanese version, the toads change color for the animation frame when they launch and retract their tongue.
| Akumajou Densetsu | Castlevania III |
|---|---|
The Eyeballs are less bloodshot in the international versions.
| Akumajou Densetsu | Castlevania III |
|---|---|
 |
 |
The Mummies were overhauled in the international versions, dropping the zombie pose completely. Their projectile was also redrawn.
| Akumajou Densetsu | Castlevania III |
|---|---|
The ghoul rabbit's sprites were replaced by those of the fleaman enemy from the original Castlevania, which behaved identically.
| Akumajou Densetsu (unused) | Castlevania III (unused) |
|---|---|
The jumping frame was also updated, but went unused in Castlevania III, and in fact appears to be a leftover of an earlier redesign.
| Akumajou Densetsu | Castlevania III |
|---|---|
 |
 |
In Castlevania III, the Giant Bat's palette was changed and it was given visible eyes. In Akumajou Densetsu, the sprite with widespread wings is only properly depicted in its upside down state. In Castlevania III, this sprite was altered by mirroring a part of the opposite wing instead. Also, in Akumajou Densetsu, the bat(s) will flash with the player's colors when hit, whereas the Castlevania III bat(s) flashes with its own designated palette when hit.
| Akumajou Densetsu | Castlevania III |
|---|---|
 |
 |
The palette of the other three phases of the bat boss was of course updated as well, but the glitched animation frames in the second and third phase were never fixed.
As intended:
| Akumajou Densetsu (Mock-up) | Castlevania III (Mock-up) |
|---|---|
 |
 |
| Akumajou Densetsu | Castlevania III |
|---|---|
 |
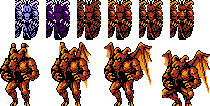 |
The Lesser Demon received a complete graphical overhaul in Castlevania III. In Akumajou Densetsu, one of the frames of animation is missing the tile that makes up part of the demon's leg. The animation frames that are seen when the demon is inside the coffin don't show up properly, and were never fixed in Castlevania III. As intended:
| Akumajou Densetsu (Mock-up) | Castlevania III (Mock-up) |
|---|---|
 |
 |
In addition, his fireball attack was changed:
| Akumajou Densetsu | Castlevania III |
|---|---|
 |
 |
In the Japanese version, the Lesser Demon spits two smaller fireballs: one forward, and the other diagonally up or down depending on the player's position. In the international versions, it was changed to three bigger fireballs that spread out.
| Akumajou Densetsu | Castlevania III |
|---|---|
 |
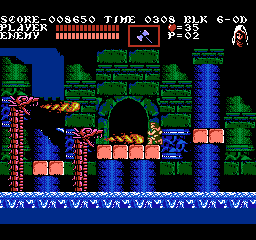 |
The Water Dragon bosses in Akumajou Densetsu can aim their flames slightly up or down. Their Castlevania III brethren can only breathe flames directly forward, but they cover a slightly longer horizontal distance. The dragons also do not open their mouth as much, and their fire breath has updated graphics, looking more like a stream of flames and using less complex animations to prevent the slowdown that happens when both dragons breathe fire in Akumajou Densetsu.
| Akumajou Densetsu | Castlevania III |
|---|---|

|
|

|
|
|

|
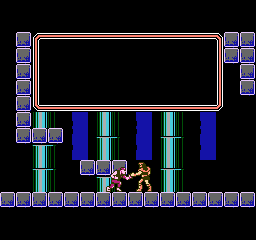
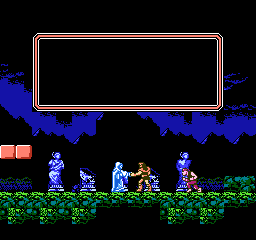
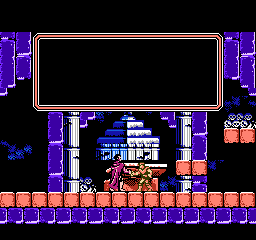
Trevor switched his shaking hands between regions in order to fix some very awkward handshakes with Grant and Sypha (Alucard also had to be redrawn as a result).
Also, for some reason, one of the cracks below the pyramid-like structure in the background was replaced with a skull.
| Akumajou Densetsu | Castlevania III |
|---|---|
|
|

|

|
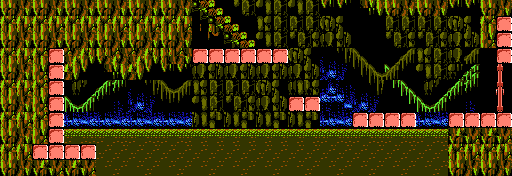
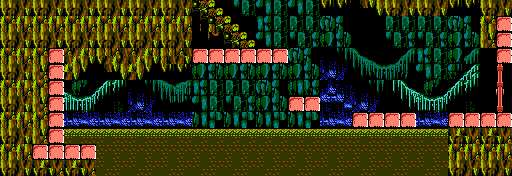
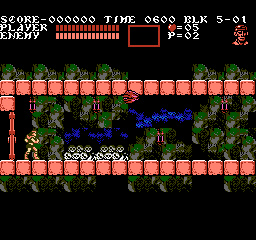
A few segments of the Murky Marsh received a graphical overhaul - the backgrounds were changed and received a different palette along with added rays of light shining through from above. The mud was also given a different texture throughout the stage.
| Akumajou Densetsu | Castlevania III |
|---|---|
 |
 |
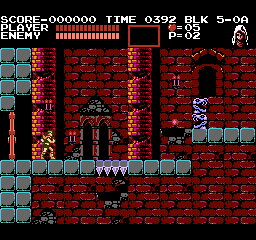
The Catacombs' palette in the early part of the stage was changed in the international versions.
| Akumajou Densetsu | Castlevania III |
|---|---|
 |
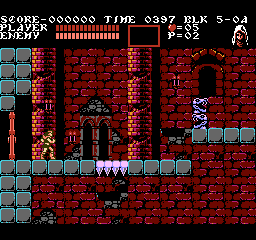 |
The Deadly Towers' spiky platforms received a different palette in the international versions.
Boss Rooms
| Akumajou Densetsu | Castlevania III |
|---|---|
 |
 |
In Akumajou Densetsu, the player is safe from damage on the lower blocks at the edges of the screen where the Cyclops is fought, as he cannot clip through the blocks and walk to the end of the screen as he does in Castlevania III. In addition to the changed boss behaviour, the graphic was modified at the bottom right corner so that the boss (and characters when leaving the stage) have something to walk on.
| Akumajou Densetsu | Castlevania III |
|---|---|
 |
 |
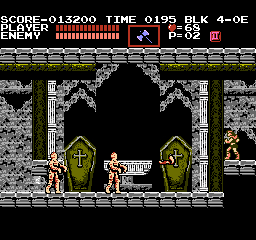
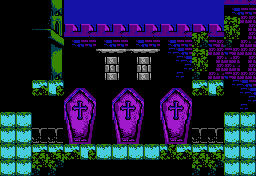
The coffin doors for the bosses in Block 4-E do not open proper like similar coffins in later stages in Akumajou Densetsu. This was fixed in Castlevania III. The international versions also removed one safe spot by adding two more blocks above the void located at the bottom right corner, making the battle tougher as the bosses can now walk to the end of the screen.
| Akumajou Densetsu | Castlevania III |
|---|---|
 |
 |
In Block 5-C, a few blocks were removed from the bottom left corner where Frankenstein's Monster enters the room in the international releases. This was probably done in order to not make it seem like he walked right through the blocks. The background was slightly altered as well.
| Akumajou Densetsu | Castlevania III |
|---|---|
 |
 |
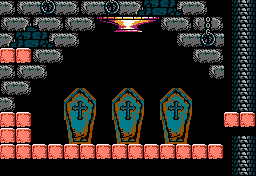
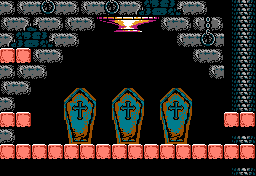
The bottom left and right blocks where the Mummies, Cyclops and Leviathan on Block 7-C are fought were removed from the international releases in order to make the battle a bit tougher.
| Akumajou Densetsu | Castlevania III |
|---|---|
 |
 |
The boss room in Block 7-7 was treated in a similar manner. Two blocks were removed from the bottom left corner and two were added in the bottom right corner.
| Akumajou Densetsu | Castlevania III |
|---|---|
 |
 |
The room where the Doppelganger is fought in Block 9-4 was also changed in the international versions. This makes the fight more difficult for Grant, as he can no longer stay easily out of the Doppelganger's reach by crawling under the middle blocks.
| Akumajou Densetsu | Castlevania III |
|---|---|
 |
 |
In Akumajou Densetsu, the demon (and final boss) in the background has a misplaced tile on one of its wings belonging to Dracula's throne. This was corrected in the international versions.
Credits
| Akumajou Densetsu | Castlevania III |
|---|---|

|
|
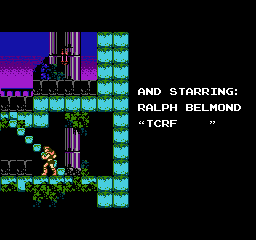
|

|
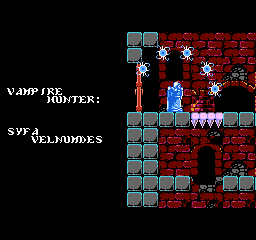
"Sypha" was changed to "Syfa" and "Ralph Belmond" was changed to "Trevor C.Belmont." The filename was also repositioned.
Alternate Credits
| Akumajou Densetsu | Castlevania III |
|---|---|

|

|
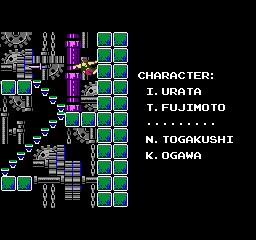
|
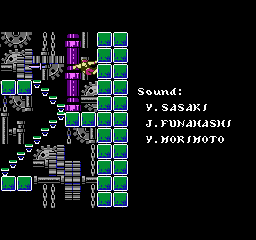
|
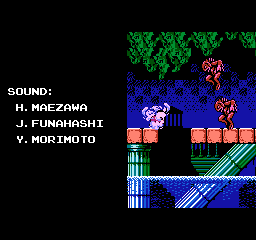
|

|
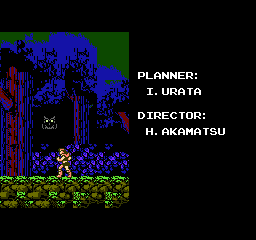
|

|
The alternate credits were rearranged and updated with the NES-staff, and the original FC-staff received a special thank you. The titles were also updated with lowercase characters.
Cheat Codes
The international versions added five cheat codes that did not exist in the Japanese version. Simply enter any of the following names at the entry screen when starting a new game for the effect to take place. With the exception of the first cheat, these are actually the surnames of staff members who were involved with the game, with Akama being short for Akamatsu (the director of the original Castlevania trilogy).
| Name | Effect |
|---|---|
| HELP ME | Starts the game with 10 lives. |
| AKAMA | Starts the Second Quest. |
| OKUDA | Starts the game with Alucard as your partner. |
| FUJIMOTO | Starts the game with Grant as your partner. |
| URATA | Starts the game with Sypha as your partner. |
Glitches
Several graphical and gameplay bugs present in the Japanese version were fixed in the international releases:
- The game masks the left 8 pixels of the screen in the Sunken City, making part of the HUD invisible, and displays glitchy graphics at the edges of the screen while scrolling, well within the TV-safe area. (See image)
- When passing through a checkpoint door, the screen bounces downward one line as the door closes.
- Spamming Nasty Grant with Holy Water when he is next to the wall can cause him to get stuck in the wall.
- Bone Dragons would sometimes not open their mouth when spitting a fireball if hit with a certain timing before they start moving.
- The battles against the Bone Dragon King and the descending portion in Block A-1 have considerably less slowdown.
- The character sprites flicker when the castle collapses in the ending.
Other Changes
Graphic
- The Bone Dragon King no longer produces splashes when its head and parts fall into the water, despite the Water Dragons' heads still doing so.
Audio
- Hitting consecutive enemies with subweapons no longer produces a scoring noise (akin to picking up a money bag).
- Eyeballs, Fishmen, and bone-throwing Skeletons have lost the sound effects for their respective attacks.
- A sound effect has been added for the blood dripping from Dracula's second form, and the heads scream when skinned. The third form also uses a unique, higher-pitched scream when defeated instead of the same one as every other boss.
Gameplay (JP to US)
Damage System
In Akumajou Densetsu, damage the player takes is specific to each enemy. Some of them deal an additional bar of damage from Stage 8 onward and in the Second Quest, while others keep their damage output consistent throughout the game. For example, Axe Knights' axes deal 2 damage before Stage 8, and 3 damage from this stage onward, while Skeletons deal 3 damage on contact in every stage. Each enemy's attacks can deal different damage as well; for example, Bone Pillars deal 3 damage on contact, and 2 damage with their flames, which increase to 4 and 3 respectively from Stage 8 onward.
In Castlevania III, damage taken instead depends on the stage, and every enemy deals the same amount of damage with any attack, like in the first game: all enemies deal 2 damage from Stages 1 to 3, 3 damage from Stages 4 to 7, and 4 damage from Stage 8 onward and in the Second Quest. However, there are two exceptions: the Cyclops in Stages 3, 4A, and 7 deals 4 damage, or 3 if the player makes contact with its head, and the Lesser Demon in Stage 7 deals 4 damage.
The table below shows the specific damage values for each enemy in Akumajou Densetsu. In both versions, Grant and Sypha take an additional bar of damage from every enemy.
| Enemy | Damage (Stages 1-7) | Damage (Stages 8-10 and SQ) |
|---|---|---|
| Axe Knight | 3 (contact), 2 (axe) | 4 (contact), 3 (axe) |
| Alucard | 2 | |
| Bat | 3 | |
| Bone Dragon King | 2 | |
| Bone Dragon | 3 (head), 2 (flame, body) | 4 (head), 3 (flame), 2 (body) |
| Bone Pillar | 3 (contact), 2 (flame) | 4 (contact), 3 (flame) |
| Crow | 3 | 4 |
| Cyclops | 4 (body, hammer), 2 (head) | |
| Death | 4 | |
| Doppelganger (Alucard) | 5 (contact), 2 (hellfire) | |
| Doppelganger (Grant) | 4 | |
| Doppelganger (Sypha) | 3 (contact), 5 (fire) | |
| Doppelganger (Trevor) | 5 (contact), 4 (whip), 3 (cross) | |
| Dracula | 2 (flame pillars), 3 (first form, contact), 4 (second and third forms) | |
| Fireman | 3 (contact), 2 (flames) | |
| Fire Eye | 3 (contact), 2 (blood) | |
| Fishman | 3 (contact), 2 (flame) | 4 (contact), 3 (flame) |
| Flying Skeleton | 3 | 4 |
| Frankenstein | 4 | |
| Frog | 3 | |
| Fuzz Buster | 3 | 4 |
| Ghost | 3 | 4 |
| Giant Bat | 3 | |
| Giant Spider | 3 (contact), 2 (small spider) | 3 |
| Gremlin | 3 | |
| Harpy | 3 | |
| Headless Hunter | 3 | |
| Lance Knight | 3 | |
| Lesser Demon | 4 | |
| Medusa | 2 (contact), 4 (arrow) | |
| Medusa Head | 2 | 3 |
| Mummy (enemy) | 3 (contact), 2 (shards) | |
| Mummy (boss) | 3 | |
| Nasty Grant | 2 (contact), 3 (weapons) | |
| Owl | 3 | |
| Skeleton | 3 (contact), 2 (bones) | |
| Slime | 3 | |
| Spook Spore | 3 (contact), 2 (smaller spores) | 3 |
| Skull Knight (Stage 1) | 2 | |
| Skull Knight (Stage 5) | 3 (contact), 2 (bones) | |
| Water Dragon | 2 | |
| Zombie | 3 | |
Enemy and Boss Changes
Various enemies and bosses have increased health from Akumajou Densetsu to Castlevania III. For simplicity, the amount of hits required to kill the affected enemies with a non-upgraded whip and an upgraded whip will be listed as a/b.
- Enemies no longer have a chance of dropping Crosses or Holy Water when killed, though they can still very rarely drop Sypha's equivalent ice and lightning spellbooks.
- Axe Knights take 12/8 hits to kill, up from 8/6. Additionally, the Cross flies back after hitting their shield, instead of going through them like usual, preventing it from hitting them twice.
- Bone Dragons only take damage if hit in the head. In Akumajou Densetsu, hitting any part of their body damages them; while this deals much less damage than hitting them in the head, it is possible for attacks to connect with both their head and parts of their body at once, effectively killing them in less hits.
- Bone Pillars take 9/6 hits to kill, up from 5/4. Their fireballs also travel much faster, and the time between their attacks is reduced; this makes them considerably harder to avoid in the stair-climbing sections in Stages 5A and 9.
- Mummies are considerably more aggressive, shooting out their shards almost immediately after beginning to walk, and with a shorter time between shots. In Akumajou Densetsu, they always walk for a few seconds before shooting out their shards.
- The Cyclops is more prone to charging towards the player if they stay on the blocks near the sides of the screen, rather than walking back and forth in the middle of the room, and it can go through the blocks while charging, making it harder to avoid.
- Medusa's snake-arrows can drift up or down when shot straight ahead, depending on the player's height relative to her when she starts aiming, shortening the window to dodge them.
- The boss Mummies' shards fly in a wavy trajectory like the enemy versions, rather than in a straight line, making them much harder to hit or dodge. Additionally, the ones in Stage 4A take 16/11 hits to kill, up from 11/8, no longer having less health than the Stage 7 versions.
- The Giant Bat is immediately vulnerable after it splits, rather than keeping some invincibility frames. This makes the fight easier, as the player can continuously time their hits with the Giant Bat's splits to dispatch all copies at once.
- Frankenstein in Stage 5A takes 22/16 hits to kill, up from 16/11, no longer having less health than the Stage 6 version.
- (Boss) Alucard's fireballs travel twice as fast.
- The Skull Knight in Stage 5 takes 32/22 hits to kill, up from 16/11, effectively having twice as much health.
- The Bone Dragon King only takes damage if hit in the head. In Akumajou Densetsu, hitting any part of its body damages it, allowing the player to do much more damage per hit if their attacks connect with multiple parts. Additionally, in Castlevania III, the Bone Dragon King leaves the first battle when its health reaches 6 bars, rather than 2 or 3 bars; while this means less damage has to be dealt to it in the first battle, it still generally requires more hits due to the previous change, making both battles harder. Lastly, the Bone Dragon King reappears with less parts of its body for the second battle, causing it to move faster and thus be harder to dodge.
- The Doppelganger takes 22/16 hits to kill, up from 16/11. Additionally, despite the changes to Grant's dagger attack in Castlevania III, the Doppelganger still uses the Akumajou Densetsu version in addition to throwing axes.
- Dracula's teleportation in his first form is slower, reappearing after the large flame pillar vanishes. This makes the battle easier overall, but prevents unavoidable damage situations where Dracula teleports into the player while still trapped by the flame pillars.
- Dracula's second form can no longer be defeated by (playable) Alucard's attack. The skinless skulls completely block the projectiles, unlike in the Japanese version.
- Dracula's third form can aim its lasers in any direction, instead of only at downward angles, allowing them to hit the player while boarding the platforms. The lasers are also longer, and have improved sprites that fully adjust themselves to the direction they fly into.
Stage Changes
- The descending section back to the entrance of the Clock Tower in Block 2-6 features Medusa Heads throughout as additional enemies.
- The Red Whip Skeleton and Ghosts in Block 5-7 appear during both Quests, rather than only the Second Quest.
- In Akumajou Densetsu, the Bats in Blocks 6-4 and 6-5 only appear during the Second Quest. In Castlevania III, the Second Quest has them spawn at an even higher frequency.
- If the player dies in Block 6-5, rather than respawning at the right side of this Block, they are sent back to the start of Block 6-4.
- The pendulum room before Dracula in Block A-2 has Bats spawn throughout, rather than being free of enemies.
- Dying in Block A-3 (where Dracula is fought) sends the player back to the start of Block A-2 (before the pendulum room). Alongside Block 6-5, this makes it the only Block in any version of the game to not serve as a checkpoint.
- It is possible to skip the stages between 4-1 and A-1 with Grant, by abusing a glitch involving changing characters in stairways.
Candles
Most stages have had items dropped from candles changed, either redistributing them throughout the stage or replacing them altogether with different ones. While some stages have lost accessibility to certain items entirely, most notably Stage 4A no longer allowing the player to obtain the Cross or Holy Water, others have received new items, such as an additional 1UP in Stage 5.
| Block | Candle location | JP item | US item |
|---|---|---|---|
| 2-2 and 2-5 | Upstairs section, below the rightmost spikes | Small heart | Axe |
| 2-3 and 2-4 | Rightmost candle after the large gear | Axe | Dagger |
| Lower right in the room before the boss | Dagger | Small heart | |
| 3-0 | On the highest background pillar, near the end of the Block | Dagger | Small heart |
| 3-1 | Fifth bonfire from the start of the Block | Cross | Small heart |
| 4-A | Third lamp from the start | Dagger | Axe |
| 4-B | Fifth lamp from the start | Cross | Dagger |
| 4-C | Second lamp from the start | Holy Water | Dagger |
| 4-D | Second lamp from the start | Cross | Dagger |
| Fourth lamp from the start | Axe | Small heart | |
| Before the tilting platforms | Dagger | Small heart | |
| 5-1 | Before the lower gate leading to Block 5-2 | Cross | 1UP |
| 5-A | Upstairs section, third candle from bottom to top | Axe | Large heart |
| Leftmost candle in the room leading to Block 5-B | Cross | Small heart | |
| 5-B | Rising section, fifth candle from bottom to top | Holy Water | 400 points money bag |
| 5-C | Right after the gate (second candle in the US version) | 200 points money bag | Large heart |
| 6-C | Second candle from the start | Axe | Large heart |
| Third candle from the start | 200 points money bag | Small heart | |
| Leftmost candle in the lower room downstairs | Dagger | Holy Water | |
| Rightmost candle in the lower room downstairs | Holy Water | Large heart | |
| 6-D | Fourth candle from the start | Cross | Large heart |
| Fifth candle from the start | Large heart | Small heart | |
| 7-2 | Before the gate to Block 7-3, second from left to right | Dagger | Small heart |
| 7-4 | Fifth candle in the room after climbing the first staircase | Holy Water | Axe |
| 7-C | Near the left wall right before the boss room | Holy Water | Large heart |
| A-1 | After the descending portion, high on the background column | Cross | 1UP |
| A-2 | Third candle after the gate | Small heart | Large heart |
| Right to the stairs leading to the pendulum room | Small heart | Axe | |
| A-3 | Right after climbing the stairs | Large heart | Small heart |
| Right before Dracula's room | Cross | Dagger |
Additionally, some stages in Castlevania III have received additional candles that were not present in Akumajou Densetsu:
- Block 1-4 has a candle containing a small heart at the right side of the boss room.
- Blocks 2-3 and 2-4 have two candles in the boss room, with the leftmost one containing a small heart and the rightmost one containing a large heart.
- The start of Block 5-1 has a candle in the enclosed area where acid drops fall, containing a Cross.
- The last stretch of Block 5-B has one candle in the lower floor containing a Cross, and another in the upper floor containing a large heart, both right before the gate leading to Block 5-C. The start of Block 5-C also has a candle right after the gate, containing a small heart.
- Blocks 6-4 and 6-5 have received a complete assortment of candles throughout them, with two near the start of Block 6-4 containing a Dagger and Holy Water, respectively, and the rest containing hearts and money bags. In Akumajou Densetsu, these Blocks lacked candles entirely.
- Block 7-2 has a candle containing Holy Water above the lowest pair of cracking blocks.
- Block A-1 has four candles throughout the descending portion, with the uppermost one containing a Stopwatch, and the rest containing small hearts. In Akumajou Densetsu, this portion lacked candles entirely. Block A-3 also has a candle below the right cup in Dracula's room, containing a small heart.
European Release
The European version keeps the US version's changes for the most part, but has received a few differences to make the game easier. It is also worth noting that the game runs slightly slower, due to the conversion from 60 to 50 Hz.
- Damage the player takes is one bar less in all stages compared to the US version. As a result, all enemies deal 1 damage from Stages 1 to 3, 2 damage from Stages 4 to 7, and 3 damage from Stage 8 onward and in the Second Quest.
- Additionally, stage hazards such as the acid drops and falling blocks in Stages 5 and 7 deal 1 damage, and moving spike blocks deal 7 damage, down from 2 and 8 respectively in both the Japanese and US versions.
- Several enemies have less health:
- Axe Knights have been reverted to their health from the Japanese version.
- Bone Dragons take 12/8 hits to kill, down from 16/11.
- Bone Pillars take 6/4 hits to kill, down from 9/6.
- The Second Quest Zombies take 2/1 hits to kill, down from 3/2.
- Firemen, Ghosts, Knights, and Sword Skeletons take two hits to kill with a non-upgraded whip instead of three. The Second Quest Knights remain unchanged.
- Mummies take only one hit to kill with a non-upgraded whip instead of two.
- The Stopwatch ticks three times instead of two, but its duration in frames remains the same.
